The recommended moisture level for painting most surfaces is typically below 12–15%, depending on the material and paint type. High moisture in walls, wood, or concrete can prevent proper adhesion, cause bubbling, peeling, or blistering, and shorten the paint’s lifespan. Before painting, use a moisture meter to check surfaces, allow wet areas to dry completely, and avoid painting in high-humidity conditions to ensure a durable and smooth finish.
When it comes to painting, you might think moisture is just a small detail, but it can make or break your entire project. Have you ever dealt with peeling paint, bubbling surfaces, or uneven finishes?
The secret often lies in the moisture level of the surface you’re about to paint. If the moisture is too high, your paint won’t adhere properly, leading to costly repairs and frustration down the line. You’ll discover the recommended moisture levels you need to check before painting, how to measure them, and why getting this right will save you time and money.
Research published in BioResources confirms that moisture levels in wood significantly affect the surface tension and viscosity of water-borne varnishes. The study found that while 8–10% MC is stable, levels reaching 12% or higher cause measurable color changes and “film stripping” because the coating cannot establish a sufficient mechanical bond with the saturated wood fibers.
Table of Contents
Ideal Moisture Levels
Maintaining the right moisture level before painting ensures lasting results. Paint bonds best on surfaces with controlled moisture. Too much or too little moisture can cause peeling, bubbling, or poor adhesion. Understanding ideal moisture levels helps in achieving a smooth, durable finish.
Optimal Range For Exterior Paint
Exterior surfaces should have moisture levels below 15%. Higher moisture can trap water under the paint. This causes blistering and peeling over time. Checking moisture levels with a meter before painting is vital. Dry conditions allow paint to stick and cure properly. Aim to paint on dry days with low humidity for best results.
Moisture Limits For Interior Surfaces
Interior walls need moisture levels below 12%. Excess moisture inside walls leads to mold and paint damage. Drywall and plaster absorb moisture easily, so testing helps prevent problems. Painting over damp surfaces reduces paint adhesion. Keep rooms well ventilated and dry before starting the job.
Impact On Wood And Drywall
Wood can expand and contract with moisture changes. Paint cracks if wood is too wet or dries too fast. Ideal wood moisture is between 6% and 12% for painting. Drywall absorbs moisture from air and spills. Painting wet drywall causes peeling and staining. Always check moisture levels to protect these materials and extend paint life.
Effects Of Excess Moisture
Excess moisture in surfaces before painting causes many problems. It affects paint’s ability to stick and dry properly. This leads to a poor finish and shortens paint life. Understanding these effects helps avoid costly repairs and repainting. Below are key issues caused by too much moisture.
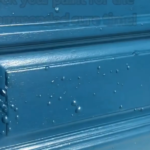
Peeling And Blistering Risks
High moisture causes paint to lose adhesion. The paint can peel away from the surface easily. Moisture trapped under paint forms bubbles or blisters. These blisters break and peel, ruining the look. Surfaces with excess moisture need drying before painting.
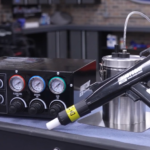
If you are a DIY users you need power coating gun but selection must perfect to avoid loss money.
Delayed Drying And Curing
Moisture slows down paint drying time. Paint may stay wet for days or weeks. This delays the curing process, weakening the paint film. A weak paint film wears off faster and loses color. Proper surface moisture level ensures fast and strong curing.
Mold And Mildew Growth
Wet surfaces encourage mold and mildew. These fungi grow under or on the paint layer. Mold stains paint and damages the surface underneath. It creates health risks and costs more to fix. Keeping moisture low prevents mold and keeps paint safe.
Measuring Moisture
Measuring moisture is essential before painting any surface. Moisture affects paint adhesion and drying time. Too much moisture can cause paint to peel or blister. Checking moisture levels ensures the surface is ready for paint. Accurate measurement helps avoid costly repainting and damage.
Best Paint Stripper for Wood (2026) – Top Options for Smooth, Clean Results
Different materials hold moisture differently. Knowing how to measure and interpret moisture readings is key. Various tools exist to measure moisture depending on the material you are working with. Understanding these methods improves painting results and surface durability.
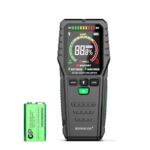
Using A Moisture Meter
A moisture meter is a handheld device that detects moisture levels in materials. It uses pins or sensors to measure water content. Place the meter on the surface or insert pins into the material for a reading. This method is quick and gives precise results. Always calibrate the meter before use for accuracy.
Interpreting Readings
Moisture meters display readings as a percentage or scale number. Low readings mean dry surfaces suitable for painting. High readings indicate excess moisture that must dry first. Each material has an ideal moisture range for painting. Consult paint guidelines or material charts for correct levels.
Tools For Different Materials
Wood often requires pin-type moisture meters for accurate results. Concrete and drywall can be tested with pinless meters that scan surface moisture. Some meters offer adjustable settings for different materials. Choose the right tool to get reliable moisture data before painting.
Leading paint manufacturers and the EPA suggest a general “Rule of Thumb” threshold of 15% MC for exterior wood, though most professionals prefer 12% for a safer margin. For ambient air, the ideal relative humidity for application is 40–70%; exceeding 85% RH effectively stops the evaporation process for water-based paints, leading to a failed cure.
Environmental Factors
Environmental factors play a crucial role in achieving the right moisture level for paint. These factors affect how paint adheres, dries, and lasts over time. Understanding them helps ensure a smooth, durable finish. The main environmental elements include humidity, temperature, and timing.
Humidity Levels
Humidity directly impacts paint drying and adhesion. High humidity slows down drying and can trap moisture under the paint. This leads to bubbles or peeling. Low humidity helps paint dry faster and stick better. Ideal humidity for painting is usually between 40% and 70%. Always check moisture levels in the surface before painting in humid conditions.
Temperature Considerations
Temperature affects paint consistency and curing time. Extreme heat can cause paint to dry too fast, resulting in cracks. Cold weather slows drying and may prevent proper curing. Most paints work best between 50°F and 85°F (10°C to 29°C). Avoid painting when temperatures drop below 45°F (7°C) to maintain paint quality.
Timing For Best Results
Choosing the right time to paint improves results. Paint when surfaces are dry and weather is stable. Midday often provides the best conditions, with warmer temperatures and lower dew. Avoid painting before rain or heavy dew, as moisture can ruin the finish. Plan painting projects during dry, mild weather for lasting results.
Seasonal Painting Tips
Seasonal changes affect the moisture levels in surfaces. These shifts impact how well paint sticks and lasts. Knowing the right moisture level for painting helps avoid common problems. Seasonal painting tips guide you on how to adjust your approach for different weather conditions. This ensures a smooth, long-lasting finish.
Paying attention to moisture and temperature during each season improves results. Below are key tips for painting in fall, managing high humidity, and avoiding rain and dew.
Painting In Fall And Cooler Months
Fall offers cooler temperatures that slow paint drying for better adhesion. The air is usually less humid, reducing moisture-related issues like blistering. Paint applied during fall cures evenly, creating a strong, smooth coat. Avoid painting when temperatures drop below 50°F, as cold slows drying and weakens paint. Check surface moisture before painting to ensure it is dry. Choose midday hours for painting when surfaces are warmest and driest.
Managing High Humidity Conditions
High humidity makes surfaces damp, preventing proper paint adhesion. Paint may peel or blister if moisture is trapped underneath. Use a moisture meter to check surface dryness before starting. Paint on days with humidity below 60% for best results. Choose paints designed for humid climates, as they resist moisture better. Improve ventilation to help paint dry faster. Avoid painting early morning or late evening when humidity peaks.
Avoiding Rain And Dew
Rain and dew add unwanted moisture to surfaces. Painting on wet surfaces causes peeling and uneven finishes. Check weather forecasts and avoid painting before or after rain. Plan to paint during dry, sunny periods to allow paint to cure properly. Avoid early morning painting when dew is present on surfaces. Use tarps or covers to protect freshly painted areas from unexpected rain. Always ensure surfaces are completely dry before applying paint.
Surface Preparation
Surface preparation is key for a strong paint finish. Proper moisture control during prep prevents peeling and bubbling. It ensures paint sticks well and lasts longer. Preparing the surface correctly saves time and money on future repairs.
Focus on drying, cleaning, sanding, and priming to get the best results. Each step affects how paint reacts to moisture and adheres to the surface.
Drying Techniques
Surfaces must be dry before painting. Use fans or heaters to speed drying. Avoid painting right after rain or heavy dew. Check moisture levels with a meter. Wait for moisture to drop below recommended limits. Dry surfaces help paint bond better and last longer.
Cleaning And Sanding
Remove dirt, dust, and old paint flakes first. Use mild detergents and water for cleaning. Let the surface dry fully after washing. Sand rough or glossy areas to create a smooth base. Sanding improves paint adhesion and evens out the surface.
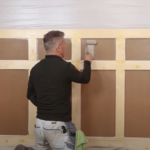
Priming Moisture-sensitive Areas
Prime surfaces prone to moisture damage, like wood or drywall. Use a primer designed for moisture resistance. Priming seals the surface and blocks moisture. It helps paint dry evenly and stay durable. Always follow primer instructions for best results.
Common Mistakes
Understanding the recommended moisture level for paint is key to a lasting finish. Many painters make avoidable errors that lead to peeling or bubbling. These common mistakes often relate to moisture and drying time. Recognizing them helps you prepare surfaces better for painting.
Ignoring Moisture Levels
Skipping moisture checks is a frequent error. Paint applied on surfaces with high moisture may not stick well. This causes bubbles and flaking later. Using a moisture meter before painting prevents these issues. Always test wood, drywall, or concrete before starting.
Painting On Damp Surfaces
Applying paint on damp surfaces causes poor adhesion. The paint may appear smooth but will peel as it dries. Dampness traps water under the paint, leading to mold or mildew. Wait for surfaces to fully dry to ensure strong bonding.
Rushing The Drying Process
Hurrying the drying time damages the paint job. Paint needs enough time to cure and harden. Painting in high humidity or cold weather slows drying. Avoid layering new coats too soon. Patience ensures a smooth, durable finish that lasts.
Ensuring Long-lasting Finish
Ensuring a long-lasting finish starts with controlling moisture levels before painting. Paint applied on surfaces with the right moisture content adheres better and resists peeling. Moisture can cause bubbling and flaking, reducing the lifespan of the paint job. Proper preparation, application, and care extend the beauty and protection of painted surfaces.
Proper Paint Selection
Choose paint designed for the moisture level of your surface. Some paints work better on damp wood or masonry. Use moisture-resistant or waterproof paints for areas prone to humidity. Selecting the right type prevents early damage and fading. Check product labels to match paint with surface conditions.
Application Methods
Apply paint only on dry surfaces within recommended moisture limits. Use a moisture meter to check levels before painting. Follow manufacturer instructions for drying times between coats. Avoid painting in high humidity or right after rain. Proper application ensures strong adhesion and a smooth finish.
Maintenance And Inspection
Inspect painted surfaces regularly for signs of moisture damage. Look for cracks, bubbles, or peeling paint. Clean surfaces gently to remove dirt and mold. Repair small issues early to prevent further damage. Routine maintenance keeps paint looking fresh and durable for years.
Frequently Asked Questions
Is October Too Late To Paint A House?
October is not too late to paint a house if temperatures stay above 50°F and surfaces remain dry. Cooler temperatures help paint cure evenly. Avoid painting during rain, frost, or high moisture. Paint midday for best drying conditions. Monitor weather closely to prevent issues.
Can You Paint In 50% Humidity?
Yes, you can paint in 50% humidity. It may slow drying but won’t ruin the finish. Ensure surfaces are dry.
Is 2 Hours Enough For Paint To Dry?
Two hours is usually enough for paint to become touch dry. Full drying and curing take longer, often 24 hours or more.
Is 12% Moisture In Wood Bad?
A 12% moisture level in wood is generally acceptable for indoor use but may be high for painting. Ideal moisture is below 12% to prevent paint issues. Use a moisture meter to ensure wood is dry enough for your specific project.
Conclusion
Maintaining the right moisture level before painting ensures better adhesion and durability. Paint sticks well to dry surfaces with moisture below recommended limits. Using a moisture meter helps check wood or walls accurately. Avoid painting if moisture is too high to prevent peeling or blistering.
Consistent monitoring leads to a smooth and long-lasting paint job. Remember, dry conditions create the best environment for paint to cure properly. Proper preparation saves time, effort, and cost on repairs later. Keep moisture in check and enjoy a fresh, lasting finish.
Related posts:
 What Causes Paint to Blister on Walls? – Moisture, Temperature, and Expert Solution
 Best Budget Moisture Meter (2026) – Accurate & Affordable for Home, Wood, and Construction
 Can You Use Wood Paint on Walls: Expert Tips & Insights
 Best Powder Coating Gun (2026) – Budget to Pro-Level Choices | Expert-Tested