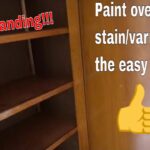
How To Prepare Stained Wood For Painting?
To prepare stained wood for painting, start by cleaning the surface to remove dirt, grease, or wax. Lightly sand the wood with fine-grit sandpaper to smooth the surface and help paint adhere. After sanding, wipe away dust with a damp cloth and apply a high-quality primer designed for glossy or stained wood. Once the primer dries, the wood is ready for painting, ensuring better adhesion, even coverage, and a long-lasting finish.
Don’t ruin your fresh paint job with sticky residue or torn drywall; learn the crucial differences in Masking Tape vs Painters Tape before you start.
Clean, degloss, sand lightly, repair, prime, then paint for lasting results.
If you want a smooth, durable finish, you need more than a coat of paint. This guide shows how to prepare stained wood for painting like a pro. I’ll share the exact steps, the products that work, and the mistakes that will cost you time and money. You will learn how to prepare stained wood for painting on cabinets, trim, furniture, and doors with confidence.
Why stained wood fights paint (and how to win)
Stain sinks into wood fibers. Many stained pieces also have varnish, lacquer, shellac, or polyurethane on top. That sealed, glossy layer blocks paint and can cause peeling or chipping.
Here is what you are up against:
- Slick finishes reduce adhesion. Paint cannot grip a shiny surface well.
- Oils, waxes, and polish leave residue. That residue can repel paint.
- Tannins can bleed through. Dark spots or yellow stains can show under paint.
- Old finishes may be brittle or cracked. Paint over them and it fails fast.
Knowing this helps you plan how to prepare stained wood for painting the right way.
Tools and materials checklist
You do not need a shop full of gear. A focused kit will do the job well.
- Safety: gloves, eye protection, N95 mask or respirator, good airflow
- Cleaning: vacuum, microfiber cloths, TSP substitute or mild degreaser, warm water
- Wax and polish removal: mineral spirits or a dedicated wax remover
- Sanding: 150–220 grit paper, sanding block, optional 320 grit for final scuff
- Deglosser: liquid sandpaper for tricky profiles and spindles
- Repairs: wood filler, putty knife, caulk for gaps at trim-to-wall seams
- Primers: bonding primer, shellac-based primer, or oil-based stain-blocking primer
- Paint: quality acrylic enamel, urethane-fortified acrylic, or hybrid enamel
- Extras: painter’s tape, drop cloths, foam rollers, quality brushes
I use this same set on client jobs. It keeps the process clean and simple while improving results.

Step-by-step: how to prepare stained wood for painting
Follow this method to avoid peeling, brush marks, and bleed-through. I use these steps in real homes and shops.
- Inspect the surface
Look for peeling finish, water stains, wax, silicone residue, or heavy grime. If the finish is cracked or alligatored, plan to sand more or strip. This first look sets the scope for how to prepare stained wood for painting. - Clean and degrease
Vacuum dust. Wipe with a TSP substitute or mild degreaser. Rinse with clean water and let dry. Do not rush this step. Paint fails fast on oily wood. - Remove waxes and polishes
If the piece ever had wax or furniture polish, wipe with mineral spirits and clean rags. Change rags often. Let it dry. This is a key step in how to prepare stained wood for painting on furniture. - Scuff sand or degloss
Use 150–220 grit to dull the shine and create a light scratch. Sand by hand with a block or use a deglosser on curves and trim. Wipe away dust with a tack cloth or damp microfiber. - Repair flaws
Fill nail holes, dents, and deep scratches. Let the filler dry. Sand smooth. Caulk gaps where trim meets walls. Clean the dust again. - Spot-prime problem areas
Seal knots, end grain, and heavy tannin zones with a shellac-based primer. It dries fast and locks in stains. This step helps prevent bleed-through. - Prime the entire surface
Use a quality bonding primer. For heavy stain or unknown finishes, use shellac or oil-based stain-blocking primer. For light stain, a water-based bonding primer can work. Follow the can for dry time. - Scuff and check
Lightly sand the primer with 220 grit. Wipe clean. Inspect for shiny spots or raw areas. Prime a second coat if needed. Strong primer is central to how to prepare stained wood for painting well. - Paint in thin coats
Apply two to three thin coats of a durable acrylic or hybrid enamel. Sand lightly between coats if needed. Let each coat dry per label. Thin coats level better and last longer. - Allow full cure
Paint feels dry fast but needs days to cure. Avoid hard use for a week if you can. This patience pays off with a tough finish.
Choosing the right primer and paint
Primer does more than color the wood. It bonds to slick finishes and blocks stains. Picking the right one is the heart of how to prepare stained wood for painting.
- Heavy stain or unknown old finish: shellac-based primer for best adhesion and stain block
- Oily or glossy trim and cabinets: bonding primer made for slick surfaces
- Tannin-prone woods like oak, mahogany, or cedar: shellac or oil-based stain-blocking primer
- Lightly stained, well-sanded wood: quality water-based bonding primer
Paint choice also matters:
- Doors, trim, cabinets: acrylic enamel or urethane-reinforced acrylic for a hard, washable finish
- Furniture: hybrids that level well and cure hard; avoid chalk paint unless you prime well
- Walls over stained paneling: bonding primer first, then standard interior acrylic paint
Pro tip from my shop: when in doubt, test a small patch. Scratch it with your fingernail after it cures. Strong adhesion means you picked the right system.
When to strip vs. when to scuff
You do not always need to strip. In many cases, scuff sanding plus a strong primer is enough. But stripping is smart when:
- The finish is cracked, crazed, or flaking. Paint will mirror those defects.
- There is heavy wax build-up or silicone contamination. Adhesion can fail.
- You want to keep fine details crisp. Thick build layers can blur edges.
- The piece has thick polyurethane with deep scratches. Stripping can reset the surface.
If you strip:
- Use a safer, low-odor stripper (citrus or soy-based) and follow the label.
- Scrape gently with a plastic scraper.
- Neutralize per directions and let it dry.
- Sand smooth and proceed with primer.
This choice is a big part of how to prepare stained wood for painting when the finish is failing.
Avoid these common mistakes
I have seen these errors ruin good projects. You can skip the pain.
- Skipping the clean step. Grease and polish wreck adhesion.
- Light primer choice on heavy stains. Tannins bleed through light primers.
- Thick paint coats to “save time.” Thick coats dry soft and show brush marks.
- No cure time. You move hardware back too soon, and it sticks.
- Using all-in-one paint-and-primer over varnish. It rarely bonds well by itself.
Keep your process tight, and the finish will last.
Safety and setup for a smooth job
Good prep is also about safety and a tidy space.
- Work in a ventilated area. Open windows and use a fan if safe.
- Wear gloves, eye protection, and a mask. Dust and solvents can irritate.
- Control dust. Vacuum, then wipe with a damp cloth.
- Follow dry times on every product. Temperature and humidity affect cure.
- Keep rags that touched solvents in a metal can with a lid. Prevent fires.
A safe, clean setup supports strong results and keeps you focused on how to prepare stained wood for painting the right way.
Timelines, budgets, and expectations
How long it takes depends on size, condition, and products used.
- Small nightstand: 1 day of active work spread across 2–3 days of dry time
- Door and trim set: 2–3 days with two coats of primer and two coats of paint
- Kitchen cabinets: 1–2 weeks including labeling, doors off, and cure time
Costs vary by product, but this is a simple guide:
- Cleaners and sanding gear: low
- Primer: medium; shellac-based is higher but worth it for stain block
- Paint: medium to high; better paint saves you time and touch-ups
Plan your schedule. This is how to prepare stained wood for painting without stress.
Real-world examples from my projects
- Cherry dresser with wax: Mineral spirits wipedowns revealed old wax. Shellac primer locked in color. Two coats of enamel gave a glassy finish. Zero bleed-through.
- Oak trim with heavy tannins: Shellac spot-prime on knots and grain. Full prime with bonding primer. Two enamel coats. The grain stayed subtle and no yellow stains showed.
- Glossy handrail: Liquid deglosser saved time on profiles. Scuff, shellac, enamel. Still chip-free after two years.
These cases reflect how to prepare stained wood for painting so the finish holds up to daily life.
Troubleshooting bleed-through, brush marks, and chips
If you see problems, you can fix them without starting over.
- Yellow or brown bleed spots: Spot-prime with shellac. Let dry. Repaint thin.
- Brush marks: Light sand with 320 grit. Add a bit of water or conditioner to water-based paint as allowed. Work in thin, even passes.
- Chipping at edges: Sand to primer. Spot-prime with bonding primer or shellac. Recoat. Let it cure longer before hard use.
A small repair done right will blend in and last.
Maintenance after painting
Give the paint time to cure hard. Then keep it clean and gentle.
- Clean with mild soap and water. Avoid harsh cleaners for the first month.
- Use felt pads under decor and lamps.
- Touch up chips early. Small spots stay small if you fix them fast.
This simple care keeps your hard work looking fresh.
Frequently Asked Questions of how to prepare stained wood for painting
Do I need to sand if I use a deglosser?
Scuff sanding improves mechanical grip, and I still recommend it. Use deglosser for tight profiles, then a light hand sand on flat areas.
What primer stops tannin bleed best?
Shellac-based primer is the gold standard for stains and tannins. Oil-based stain blockers also work, but shellac dries faster and bonds well.
Can I use paint-and-primer-in-one over stained wood?
Not by itself. You still need a dedicated bonding or stain-blocking primer for slick or stained surfaces.
How long should I wait between primer and paint?
Follow the label, but most primers need 1–4 hours to dry. In cool or humid rooms, add extra time to be safe.
When should I strip instead of sand?
Strip if the old finish is cracked, waxy, or very thick. If the finish is sound and just glossy, scuff sanding and strong primer are enough.
Will water-based paint stick to an oil-based finish?
Yes, if you clean, degloss, and prime with a bonding or shellac-based primer. Proper prep bridges the two systems.
What grit sandpaper should I use?
Use 150–220 grit to scuff and 320 grit for a final smooth pass. Always wipe away dust before primer or paint.
How many coats of primer do I need?
Usually one to two coats. Heavy stains or redness may need a second coat to block bleed-through.
What is the best paint for cabinets and trim?
Use a high-quality acrylic enamel or a urethane-reinforced acrylic. These cure hard, resist chips, and clean well.
How do I know if I removed all the wax?
Rub the surface with a clean rag after mineral spirits. If the rag stays clean and the surface feels squeak-dry, you are ready to sand and prime.
Conclusion
Prepping stained wood is a simple, repeatable process: clean, degloss, sand, repair, prime, and paint. When you master how to prepare stained wood for painting, you get a durable finish that looks sharp and stays that way. Start with one piece, test your system, and then scale up with confidence. Ready to tackle your next project? Bookmark this guide, share it with a friend, and leave a comment with your results or questions.
Related posts:
 Can I Paint Over Varnished Wood Without Sanding? (2026) – What Actually Works
 Best Paint for Kitchen Cabinets Without Sanding – No Prep, No Mess, Long-Lasting Results | Expert Tested
 How To Use Oil Paint On Wood– Prep, Painting & Step-by-Step Guide for a Smooth Finish
 7 Proven Ways: How To Eliminate Brush Strokes When Painting