The difference between thick and thin roller naps lies in how much paint they hold and the texture they produce. Thick naps (¾ inch or more) are ideal for rough or textured surfaces like stucco, brick, or textured ceilings because they hold more paint and reach into crevices. Thin naps (¼–⅜ inch) work best on smooth surfaces such as doors, cabinets, or walls, providing a smoother finish with less texture. Choosing the right roller nap ensures even coverage, reduces splatter, and achieves the desired surface finish.
The “Buy Now” Decision:
- For standard interior walls, choose the 3/8″ Microfiber Roller—it is the best all-rounder for a smooth, DIY-friendly finish.
- For masonry, brick, or popcorn ceilings, choose the 3/4″ Heavy-Duty Nap to save time and ensure full coverage.
Best Paint Roller – Expert-Tested Rollers for Walls & Ceilings
Thick naps hold more paint; thin naps give smoother, finer finishes on flat surfaces.
If you want pro results, you need to master thick vs thin roller nap. I’ve tested both across drywall, stucco, cabinets, and ceilings for years. In this guide, I’ll break down how nap thickness affects finish, speed, coverage, and cleanup. You’ll learn when thick vs thin roller nap shines, what to avoid, and how to choose the right cover for any job.
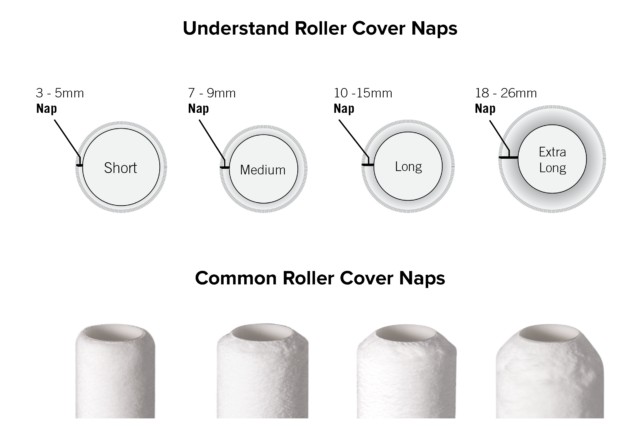
Understanding roller nap thickness
Nap is the length of the fabric fibers on a roller cover. It is measured in inches. Common sizes include 1/4, 3/8, 1/2, 3/4, 1, and 1-1/4 inch. Shorter nap is thin. Longer nap is thick.
The fabric also matters. It affects how much paint the roller can hold and release. Here are typical materials and traits:
- Microfiber holds a lot and lays paint very smooth on many surfaces.
- Woven polyester sheds less and gives a fine finish on smooth walls.
- Knit polyester releases more paint fast but can add more texture.
- Lambswool carries a ton and works well on rough masonry and stucco.
- Blends balance release, durability, and finish quality.
Core size and density also play a role. A high-density core resists crushing under pressure. It keeps coverage even. Paint makers and pro guides stress matching nap thickness to the surface texture and paint type. That is the heart of thick vs thin roller nap.

Thick vs thin roller nap: key differences
When comparing thick vs thin roller nap, think about the surface first. Then match the nap to the job. Here is how they stack up:
- Finish quality: Thin nap (1/4 to 3/8 inch) gives a smoother finish on flat, fine surfaces. Thick nap (3/4 inch and up) leaves more texture and stipple.
- Paint capacity: Thick nap holds more paint. It speeds up large or rough areas. Thin nap holds less, which helps control and reduce runs.
- Splatter risk: Thick nap splatters more if you roll too fast. Thin nap splatters less and keeps edges cleaner.
- Speed and coverage: Thick nap covers rough surfaces faster. Thin nap shines on trim, doors, and cabinets where detail matters.
- Texture matching: Thick nap reaches into pits and grooves on stucco, brick, and heavy orange peel. Thin nap suits new drywall, smooth plaster, and sanded wood.
- Sheen control: Thin nap helps keep gloss and semi-gloss smooth and glassy. Thick nap can dull the shine due to texture.
When you weigh thick vs thin roller nap, pick what serves the surface and desired look. That simple step prevents a lot of fixes later.

Choosing the right nap by surface and project
Match the nap to the surface texture. You can use this quick map for thick vs thin roller nap:
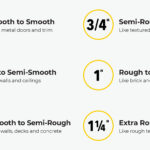
- Cabinets, doors, furniture: 1/4 or 3/16 inch microfiber or woven. Smoothest finish.
- Level 4–5 drywall, skim coat, smooth plaster: 3/8 inch microfiber or woven.
- Light orange peel, slight texture, eggshell walls: 1/2 inch knit or microfiber.
- Knockdown texture, rough drywall, popcorn ceiling: 3/4 inch knit or lambswool.
- Stucco, brick, block, rough siding, fences: 1 to 1-1/4 inch lambswool or heavy knit.
- Primer on porous surfaces: Go one step thicker than the finish coat for better fill.
- High-gloss or urethane topcoats: Go one step thinner for less stipple.
Consider the paint’s viscosity too. Thick, high-build paint may need a thicker nap for good release. Thin, fast-drying coatings can flash off. They need a thinner nap and faster layoff.
Field notes: what works and what fails
I learned thick vs thin roller nap the hard way on a stucco wall. A thin 3/8 inch cover looked fine in the tray. On the wall, it skipped over valleys. I had to back-roll with a 1 inch lambswool to fill the voids. The right nap would have saved an hour.
On a cabinet job, a thick 1/2 inch cover looked “fuzzy” in the light. The doors showed clear roller texture. Swapping to a 1/4 inch microfiber and tipping off each pass fixed it. The finish looked sprayed.
For ceilings, a 3/4 inch cover often hits the sweet spot. It loads well and hides light texture. But if the room has can lights, go easy. A slower roll and quick back-roll avoids shadows and lap marks.
Pro technique tips for better results
Your technique can make or break thick vs thin roller nap results. Follow these simple steps:
- Prep the cover. Rinse and spin to remove loose fibers. Pre-wet with water for latex or solvent for oil, then spin out.
- Load right. Roll the cover in the tray until it looks full but not dripping. Rotate and press lightly to saturate evenly.
- Use the “W” pattern. Lay paint in a loose “W,” then fill it. This spreads paint without lines.
- Keep a wet edge. Work in small sections. Overlap the last pass by one-third.
- Watch your pressure. Let the roller do the work. Too much pressure causes streaks and orange peel.
- Back-roll. On rough surfaces, cross-roll lightly to even out texture.
- Mind the edges. Feather the edges before the paint tacks to avoid lap marks.
- Clean and store. Wash until water runs clear. Centrifuge or spin dry. Store in a zip bag to keep fibers straight.
For thick vs thin roller nap, the final layoff matters. On smooth work, lay off in one direction with a near-dry roller. On rough work, cross-roll to press paint into voids.
Cost, speed, and waste trade-offs
Thick vs thin roller nap also affects budget and time. Here is what to expect:
- Time: Thick nap speeds up rough walls and large ceilings. You do fewer trips to the tray. Thin nap slows you down a bit but cuts rework on smooth finishes.
- Material use: Thick nap uses more paint. It can leave extra stipple if rushed. Thin nap uses less paint but may need an extra coat on very porous surfaces.
- Waste: Cheap covers shed and fail, which wastes paint and time. A quality cover can be washed and reused many times.
- Cleanup: Thick nap is harder to clean due to deep fibers. Thin nap cleans faster and dries quicker.
If you bid jobs, note this. Thick nap can save labor on rough stock, even with higher paint use. Thin nap can save rework on fine finishes, which saves the schedule.
Common mistakes and fixes
Most issues with thick vs thin roller nap are easy to avoid. Here are common errors and quick fixes:
- Using thin nap on rough surfaces: Leads to skip marks. Fix by back-rolling with a thicker nap to fill low spots.
- Using thick nap on smooth surfaces: Adds texture and stipple. Sand lightly when dry, then recoat with a thinner nap.
- Overloading the roller: Causes runs and heavy texture. Offload in the tray and roll out gently.
- Rolling too fast: Causes splatter and uneven film. Slow down and keep a steady rhythm.
- Ignoring nap material: Wrong fabric can shed or drag. Choose microfiber or woven for smooth, knit or lambswool for rough.
- Not maintaining a wet edge: Leads to lap marks. Work smaller sections and feather edges right away.
A small test patch saves time. Try both a thick and thin cover on the same wall. You will see the difference in minutes.

Compatibility with paint, sheen, and climate
The right choice in thick vs thin roller nap also depends on coating and conditions. Consider these factors:
- Paint type: High-solids or elastomeric paints like thick nap for release. Thin enamels and trim paints look best with a thin nap.
- Sheen level: Flat and matte hide texture well, so thicker nap is fine on textured walls. Semi-gloss and gloss need a thin nap for a mirror look.
- Dry time: Fast-dry paints need quick layoff. Thin nap helps. Thick nap can drag if the film starts to tack.
- Temperature and humidity: Hot, dry air speeds drying. Use a thinner nap and smaller sections. Cool, damp air slows drying. A thicker nap can help maintain flow.
- Primer vs finish: Primers soak in. Go thicker to load the surface. Finishes show texture. Go thinner for a clean look.
Most paint makers publish nap guidance on the label. It almost always aligns with the rules above for thick vs thin roller nap.

Frequently Asked Questions of thick vs thin roller nap
What is the best nap for smooth walls?
Use 3/8 inch microfiber or woven for most smooth walls. For ultra-smooth surfaces or high-gloss, drop to 1/4 inch.
Which nap should I choose for stucco or brick?
Go with 1 to 1-1/4 inch lambswool or heavy knit. It holds enough paint to reach deep pores and pits.
Can I use a thick nap with gloss paint?
You can, but it often shows texture. A thin 1/4 to 3/8 inch nap gives a smoother, glossier look.
Why am I getting splatter when I roll?
It’s often a speed or nap mismatch issue. Slow your roll and consider a thinner nap for smooth walls or a quality thicker nap for rough walls.
Do microfiber rollers really make a difference?
Yes, they hold a lot and lay down a fine film. Microfiber works well in both thin and mid naps for a smooth finish.
How do I stop lap marks on large walls?
Keep a wet edge and work smaller sections. Use the right nap and feather each pass before it sets.
What nap is best for ceilings?
For smooth ceilings, use 3/8 to 1/2 inch. For textured ceilings, use 3/4 inch to reach into crevices.
Is a more expensive roller cover worth it?
Often yes. Better covers shed less, clean easier, and keep shape longer, which improves results.
Conclusion
Choosing between thick vs thin roller nap comes down to surface texture, paint type, and the finish you want. Thin naps create smooth, clean coats on flat surfaces. Thick naps speed up rough, porous areas and boost coverage. Test on a small patch, adjust your technique, and you will see pro results fast.
Ready to paint smarter? Pick the right nap for your next project, try the tips above, and share your results. Subscribe for more practical guides, or drop a question in the comments so we can help you nail your next job.
Related posts:
 A Guide To Roller Nap Lengths– Smooth, Medium, or Thick? Explained
 What Is a Roller Nap? – Choosing the Perfect Roller for Walls and Ceilingswhat is a roller nap?
 What Nap Roller To Use On Popcorn Ceiling?-Pro Painter Tips for Smooth Results
 Best Primer For Eggshell Paint– Top Picks for Smooth, Even Coverage