If you applied primer too thin, it may not properly seal the surface or provide enough coverage for the topcoat. Thin primer can lead to uneven paint color, poor adhesion, and visible stains or patches bleeding through. This often happens when the primer is over-thinned, rolled out too far, or not applied evenly. To fix the issue, allow the first coat to dry completely, lightly sand if needed, and apply a properly loaded, even second coat to ensure full coverage and better paint performance.
The “Save Your Paint Job” Toolkit
Applying primer correctly is 90% about using the right tools. If your primer is going on too thin, these professional-grade supplies will ensure your next coat is perfect.
Recommended Product Why It Fixes the “Thin Primer” Problem Key Feature Purdy White Dove Roller Covers (3-Pack) High Load Capacity. Holds more primer so you don’t “dry roll” the wall. Lint-free, smooth finish for all paints/primers. Purdy XL Series Sash Brush Better Pick-up. Holds 30% more product than cheap brushes for thick coverage. Hand-chiseled trim for precise “cutting in.” Wagner SprayTech Paint Eater Best for Exterior Fixes. If your thin primer is peeling, this levels the surface. High-performance disc for aggressive prep work.
You are not alone. I have seen applied primer too thin on walls, trim, doors, cars, and even faces with makeup primer. The fix is simple once you know the signs, the right build, and the steps to recover. This guide blends field experience, clear how-tos, and pro checks so you can prevent applied primer too thin and get a smooth, strong base every time.

Is Primer Safe to Use Indoors?– How to Minimize Fumes & Risks
What “applied primer too thin” really means
Primer is the base that helps paint, coatings, or makeup grip and look smooth. When the layer is too thin, it cannot seal pores, block stains, or level texture. The result is weak bond and a finish that fails fast.
In paint and coatings, a thin coat often means you spread it too far. It can also mean low build from wrong tools or wrong spray setup. In makeup, it means not enough product to even the skin or hold the foundation. In all cases, a thin coat will show flaws and break down early.
Clear signs your primer coat is too thin
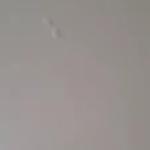
You can spot applied primer too thin with a quick check. Look for these clues before you move to paint or topcoat.
- Shadowing or see-through spots where the base still shows
- Patchy sheen with dull and shiny areas that look uneven
- Rough or fuzzy fibers on wood that still feel raised
- Stains that bleed through, like tannin or smoke marks
- Easy scratch or peel with your fingernail or tape
- Sanding burn-through after one or two light passes
- Auto panels that still show sanding marks or metal map lines
- Makeup that pills, slides, or clings to dry patches
Pro tip: Do a small tape pull test. Press painter’s tape hard, then snap it off. If primer lifts, you likely applied primer too thin or did poor prep.

Why primer ends up too thin
Applied primer too thin has simple causes. Once you find yours, it is easy to fix the process.
- Overspreading to save time or product
- Wrong roller nap or foam roller that lays on too little
- Sprayer tip too small or pressure too low
- Over-thinning beyond the label
- Hot, dry, or windy conditions that flash off solvent or water
- High porosity surfaces that drink the primer
- Skipping a second coat on problem substrates
- Rushing the job to hit a deadline
Real-world note: On a hot garage job, I watched sprayed primer flash mid-air. The panel looked covered, but the film was dry dust. The next day, it failed the tape test. Heat and low pressure made the coat too thin.
:max_bytes(150000):strip_icc()/necessary-to-prime-before-painting-1821154-5e433f12b25744098d49396f9c8c1e12.jpg)
Applied Primer Too Thick: What Happens? Problems & Fixes Explained
Risks of going too thin
Applied primer too thin can cost you time and money. It can also cause early failure.
- Poor adhesion that leads to peeling or flaking
- Stains that bleed into your topcoat
- Uneven sheen and flashing that show lap marks
- More paint use later since the base is not sealed
- Texture that telegraphs through, like sanding scratches
- Rust creep on metal and edge failure on cars
- Makeup that oxidizes, creases, or fades fast
Think of primer like the footing of a house. Thin footing, weak house. Thin primer, weak finish.
How to fix a too-thin primer coat right now
If you see applied primer too thin, do not panic. You can salvage it with a short set of steps.
- Let it cure as long as the label says. Do not trap solvent or water under the next coat.
- Scuff sand lightly to add tooth. Use 220–320 for walls and wood, 400–600 for auto primer. Wipe clean with a lint-free cloth.
- Spot prime bare or thin areas first. Feather the edges.
- Apply a full second coat at the right spread rate. Use the right roller nap or a larger spray tip per the data sheet.
- Recheck with a tape test or a quick scratch test. If in doubt, add one more coat on problem zones.
Extra for auto: If you burned through, add a high-build coat where needed. Block sand flat. Guide coat helps show lows and highs.
Makeup fix: Pat a pea-size dot of primer into oily zones, wait 60 seconds, then apply foundation. Do not rub hard. Press and roll.
How thick should primer be? Simple WFT and DFT basics
Good primer is about film build, not just coverage. Two terms help you hit the mark.
- Wet film thickness, or WFT, is how thick the coat is when wet.
- Dry film thickness, or DFT, is what remains after it cures.
Most wall and trim primers aim for about 1–1.5 mil DFT per coat. With typical solids, that is about 3–4 mil WFT. Many high-build auto primers need more, often 2–4 mil DFT per coat, with a total stack of 4–6 mil before paint. Exact numbers vary, so use the product’s data sheet. Use a simple wet film gauge to confirm WFT. It is cheap and fast.
Makeup has no mil gauge, but the idea is the same. A thin, even veil that hides pores and grips. Not a patchy swipe.
Tools and techniques to avoid “applied primer too thin”
Your tools decide your build. Pick them with intent and you will not get applied primer too thin.
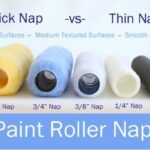
- Rollers: Use 3/8 inch for most walls, 1/2 inch for textured or porous. Foam is fine for doors if the primer is self leveling.
- Brushes: Use a quality nylon/poly blend for water-based and natural bristle for oil-based. Load the brush and do not dry brush.
- Sprayers: Match tip size to product. Raise pressure until the fan is even. Keep a wet edge and overlap 50 percent.
- Mix and strain: Stir well. Strain for spray. Only thin within label limits.
- Spread rate: Do not overspread. Many primers cover 200–400 square feet per gallon. Check the label and stay within range.
- Conditions: Aim for 50–85°F and low to mid humidity. Avoid wind and direct sun.
Pro habit: Use a wet film gauge during the first pass. It is like a fuel gauge for primer. You will never guess again.
Surface-specific advice to prevent applied primer too thin
Different surfaces ask for different builds. Here is how to dial it in.
Walls and wood trim
- Spot prime stains first with a stain-blocking primer.
- Use two coats on new drywall or bare wood for full seal.
- Sand nibs between coats for a glassy finish on doors and cabinets.
Metal and rust-prone areas
- Clean to bare, bright metal where you can. Use a degreaser first.
- Use etching or epoxy primer per the substrate and product guide.
- Hit edges and welds with an extra pass. These thin out fast.
Automotive panels
- Use high-build primer over body filler and sand scratches.
- Apply two to three medium-wet coats with flash time between.
- Guide coat and block sand. Re-prime low spots rather than rubbing thin.
Makeup primer
- Start with a pea-size amount. Warm it between fingers.
- Press into T-zone and areas with texture. Let it set for one minute.
- If it pills, you either used too little or the skincare is not set. Wait longer or switch formula.
Prevention checklist and pro tips
Use this short list on every job to avoid applied primer too thin.
- Read the data sheet and label before you start
- Test a small area with a wet film gauge
- Use the right roller nap, tip size, and pressure
- Mind the spread rate and do not overspread
- Allow full dry and recoat times
- Use a tape pull test in a discreet spot
- Add one more coat on porous or high-wear zones
From experience: When a deadline looms, people skip the second coat. That move often adds a full day later. One more primer coat now saves two coats of paint later.
Quick answers to common questions about thin primer
Below are fast, practical answers that clear up common pain points with applied primer too thin.
How do I know if I need another coat?
If you can see patchy areas, stains, or feel rough spots, add a coat. A clean tape pull that does not lift primer is a good sign you can move on.
Can I fix a thin spray coat without redoing everything?
Yes. Scuff sand, spot prime thin zones, then add one full, even coat. Match your tip and pressure to the primer.
Does a darker color always need more primer?
Often yes, because dark colors can show flaws. One extra primer coat helps block and levels the base so the color looks even.
Frequently Asked Questions of applied primer too thin
How many coats of primer do I need if the first was too thin?
Usually one more full coat does it. On porous drywall or bare wood, two extra coats may be best.
Will a thin primer coat cause paint to peel?
Yes, it can. Thin primer weakens adhesion and lets moisture or stains push from below.
Can I thin primer with water or solvent to help it flow?
Only thin within the label limits. Over-thinning lowers solids and leaves you with applied primer too thin.
What happens if I paint over thin primer?
You may see flashing, stain bleed, or peel. The finish can look blotchy and may fail early.
How long should I wait before adding another primer coat?
Follow the can or data sheet. Many water-based primers need 1–4 hours; oil-based may need longer.
Is high-build primer worth it?
For rough surfaces and auto work, yes. It fills scratches and helps you avoid applied primer too thin.
Can I use a sealer instead of more primer?
A sealer can lock in porosity and stains, but it does not add much build. Use it with, not instead of, proper primer thickness.
Does temperature affect primer thickness?
Yes. Heat speeds dry and can thin the wet edge. Cold slows cure and can sag. Both can lead to poor film build.
How do I test adhesion if I think the primer is too thin?
Use a simple tape pull test or a cross-hatch test with a razor and tape. Little to no lift means you are good.
What roller nap avoids a thin coat on textured walls?
Use 1/2 inch nap for light texture and 3/4 inch for heavy. It helps lay down enough primer.
Conclusion
A strong finish starts with the right base. If you spot applied primer too thin, slow down, test, and add the build you need. Use the right tools, mind spread rates, and trust simple checks like the wet film gauge and tape test.
Put these steps to work on your next project. Your paint, panels, or makeup will look better and last longer. Want more handy guides like this? Subscribe, share your questions, or drop a comment with your toughest primer challenge.