Looking for KILZ 3 reviews? KILZ 3 is a popular interior primer known for blocking stains, sealing odors, and providing a smooth base for paint. Users praise its fast drying time and strong coverage, though some note it may require multiple coats on darker surfaces. Ideal for prepping walls, ceilings, and trim, KILZ 3 is widely recommended for both DIYers and professionals seeking reliable results.
Why DIY Painters Struggle Without the Right Primer
I’ve been there. You’ve got the perfect shade of “Sunset Terracotta,” the brushes are out, and you just want to see that color on the wall. But here is the cold, hard truth I learned the hard way: skipping or skimping on primer is like building a house on sand.
Before we dive into my KILZ 3 experience, let’s talk about the “nightmares” that usually happen when you rush. Trust me, I’ve lived through every single one of them in my own guest bedroom and kitchen.
Stubborn Stains and Uneven Walls
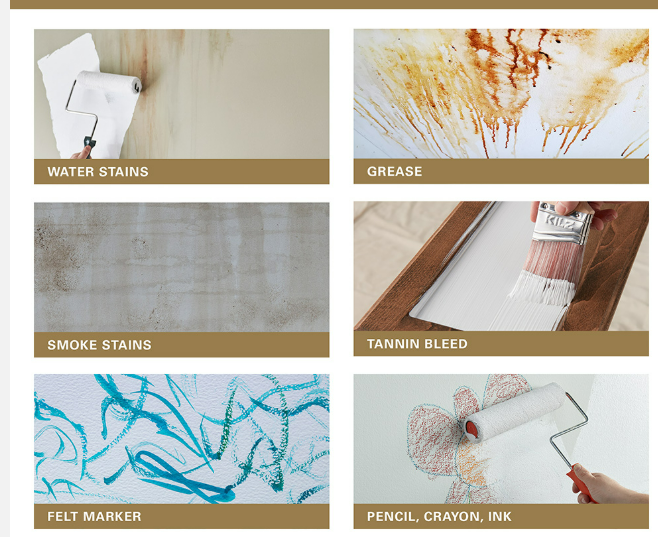
Have you ever painted a wall three times, only to see a faint yellow water ring or a child’s purple crayon mark bleed through? It’s infuriating.
- The Ghost Mark Problem: Ordinary primers often act like a thin veil. They look okay at first, but as the paint dries, those old smoke marks or water stains rise from the dead. We call these “ghost marks.”
- The KILZ 3 Promise: This is where a high-solids primer like KILZ 3 is supposed to save your sanity. It’s designed to create a literal barrier that seals those stains in so they can’t ruin your topcoat.
Peeling, Flaking, and Poor Adhesion
Last summer, I painted a small wooden cabinet without prepping it properly. Two weeks later, the paint literally peeled off in strips like a sunburn.
- Why it happens: Paint needs something to “grip.” On glossy surfaces or walls with high humidity (like bathrooms), standard paint just slides around.
- The Texture Factor: If your wall has a weird texture or old, chalky paint, your new layer won’t stick. You’ll end up with flakes on the floor and a patchy wall.
Common Questions Frustrated Painters Ask
I get these questions all the time because I used to ask them too:
- “Why is my wall still showing stains after painting?” Usually, it’s because your primer didn’t have enough “blocking power.”
- “Do I really need to prime at all?” If the surface is stained, porous, or slick? Yes. Every single time.
- “Is it worth the extra time and cost?” When you consider the cost of buying double the “pretty” paint to cover a mistake, primer is actually a huge money saver.
KILZ Original Reviews: Real-World Results, Stain Tests & What Nobody Tells You
Hands-On Testing of KILZ 3
I didn’t just read the label. I took a gallon of KILZ 3 into the trenches of my own home to see if it actually worked or if it was just hype.
What I Tested
I wanted to be thorough, so I picked three very different spots:
- The Kitchen (Drywall): Dealing with grease splatters and high heat.
- An Old Side Table (Wood): Testing how it handles raw wood tannins.
- The Hallway (Previously Painted): Checking how it sticks to old, glossy latex paint.
I used both latex and enamel topcoats over the primer. I even tested it on a rainy, humid Tuesday in a small bedroom with poor airflow to see how it would dry.
Application Experience
Applying KILZ 3 felt a bit different than the cheap stuff I used in college.
- Coverage: One gallon went a surprisingly long way. I managed to cover a medium-sized room with plenty to spare.
- Brush vs. Roller: Using a roller was a dream—it went on thick and creamy. When I used a brush for the corners, I noticed it didn’t drip as much as thinner primers, which kept my floors (mostly) clean.
- The Smell: This is a heavy-duty latex primer, but it still has a “paint” scent. In my small bedroom test, I definitely needed to keep the window cracked. It’s not overwhelming, but you’ll know you’re working.
Pro Tip: Check the current price on Amazon to see if you can snag a deal before your next project weekend.
Texture, Coverage, and Finish
The real magic of a primer isn’t just in the can. It’s in how it changes the way your topcoat behaves. When I used KILZ 3 on my hallway walls last Saturday, I noticed the difference immediately. It turns a thirsty, uneven surface into a smooth canvas that actually helps your expensive paint go further.
Smoothness and Adhesion
I’ve used cheap primers that leave the wall feeling like sandpaper. That wasn’t the case here. KILZ 3 creates a very “tight” surface. This helps with paint adhesion, meaning your color sticks like glue rather than just sitting on top.
- No Streaks: I rolled it on quickly, and it leveled out beautifully. I didn’t see any of those annoying raised ridges or pooling in the corners.
- Final Texture: Once dry, the wall had a uniform Look. It filled in the tiny pores of the drywall so my final semi-gloss paint looked professional, not patchy.
Drying and Recoating Times
I’m impatient. I want to see results fast. On a dry afternoon, the first coat of KILZ 3 felt dry to the touch in about 30 minutes.
- First Coat Speed: It dries quickly enough that by the time I finished the last wall, the first one was nearly ready.
- The Second Coat Rule: For most areas, one coat was plenty. However, on a spot where my nephew had used a permanent marker, I did a quick second “spot” coat. It blocked the ink entirely.
Real-Life Notes
I’ll be honest: there is a specific kind of joy in watching a nasty stain vanish.
“I noticed the wall felt silky but not gummy as I ran my hand over it. The stains disappeared almost instantly, which made me feel accomplished before I even opened the colored paint.”
Time Commitment Reality Check
Let’s be real. Nobody “loves” the prep work. We all want to skip to the fun part. But if you want a finish that doesn’t peel by next Christmas, you have to put in the time. Here is how my Sunday project actually went.
The Prep Phase: More Than Just Masking
I spent about two hours just getting ready. This involved:
- Sanding: Scuffing up a few glossy surfaces so the primer could grab hold.
- Cleaning: Wiping down dust and cobwebs (why are there always cobwebs?).
- Taping: This is the tedious part, but it saves your baseboards from “the splatter.”
Application and Intervals
The first coat took me about an hour for a standard 10×12 room. I used a thick-nap roller for the main walls and a 2-inch brush for the edges.
I waited a full hour before even thinking about the topcoat. While the label says you can move fast, I found that giving it a bit extra time—especially in my humid kitchen—made the paint go on much smoother.
Total Project Duration
From the first piece of tape to the final brush rinse, I spent about six hours on one room. It’s not an “instant miracle,” but the result is a room that looks like a pro did it. If you try to do it in three hours, you’ll likely end up with smoke stains or streaks peeking through your hard work.
Cleaning and Daily Hassles
Let’s talk about the part of DIY no one puts on Instagram: the cleanup. Even a great primer can be a total pain if it turns your sink into a chalky mess. Since KILZ 3 is a water-based latex primer, I expected an easy exit strategy. Here is how it actually felt to wrap up my day.
Tools for the Job
You don’t need fancy solvents here. I just used warm water and a bit of dish soap. I kept a small bucket nearby for my brushes so they wouldn’t stiffen up while I grabbed a sandwich.
Brush and Roller Washout
I was pleasantly surprised. Sometimes thick primers “glue” the bristles together, but this rinsed out fairly well.
- The Brush: Five minutes under the kitchen tap and it was back to normal.
- The Roller: I’ll be honest—I usually toss my roller covers. But for the sake of science, I washed one. It took some elbow grease, but the white pigment eventually let go.
Mess and Storage
I did have one small spill on my tile floor. Since I caught it fast, a wet rag wiped it right up. No harm done! For the leftover primer, I tapped the lid back on tight with a rubber mallet. I stored the can in my hallway closet. Pro tip: don’t leave it in a freezing garage, or it will turn into a weird cottage cheese texture.
Quick Check: You canCheck Price On Amazonfor local availability if you’re ready to start your own messy (but worth it) project!
Real Negatives of KILZ 3
I want you to love your walls, so I have to be real with you. KILZ 3 is a workhorse, but it isn’t perfect. I noticed a few things that might annoy you if you aren’t prepared.
The “New Paint” Smell
Even though it is billed as a low-odor option, “low” does not mean “no.” In my small spare bedroom, the scent was quite thick. If you have a sensitive nose, keep the fans running. It isn’t as harsh as an oil-based primer, but it’s definitely there.
The Battle with Dark Stains
If you are trying to cover a dark red wall or very heavy smoke stains, one coat won’t cut it. I found that I needed a second pass to get a truly blank canvas. If you’re in a rush, this might feel like a setback.
Humidity is the Enemy
I tried a test patch on a rainy, humid afternoon. The “quick-dry” promise went out the window. It stayed tacky for much longer than the label suggested. If it’s sticky outside, plan for extra drying time indoors.
Physical Strain
One final note: a full gallon is heavy! Dragging it up and down a ladder all day is a workout. If you have a smaller project, maybe grab the quart size instead. Your back will thank you on Monday morning!
KILZ 2 Review: Does This Primer Actually Solve the Problem?
Who KILZ 3 is Actually For (and Who Isn’t)
Choosing a primer is like picking a pair of shoes. You wouldn’t wear flip-flops to hike a mountain, right? After spending a messy Saturday with a roller in one hand and a coffee in the other, I realized that KILZ 3 isn’t a “one size fits all” tool. It is a specific solution for specific problems. Here is my take on who will love it and who should walk away.
Ideal Users
If you fall into these camps, you’ll likely find this can to be a lifesaver.
- Home DIYers: If you are tackling a bedroom or a kitchen on your day off, this is a great fit. It is easy to find, easy to apply, and handles the typical wear and tear of a busy house.
- Stain-Fighting Warriors: I used this on a wall that had old smoke stains from a previous owner. It felt like a magic trick. If you have “battle scars” on your walls—like juice spills or crayon art—this stain-blocking primer is your best friend.
- Budget-Conscious Renovators: You want a professional look without the professional price tag. This gives you great paint adhesion on a budget. It saves you money because you won’t need five coats of expensive topcoat paint to hide a dark spot.
Less Suitable Users
Sometimes, the “wrong” project can make even a good product feel like a failure.
- The “Speed Demons”: If you want to prime and paint an entire apartment in three hours, stop. This needs time to cure. For ultra-fast, single-day projects, you might feel held back by the drying intervals.
- Tiny, Sealed Apartments: If you live in a studio with tiny windows, the odor might be a bit much. It is a latex primer, but it still has a punchy scent that needs a good breeze to clear out.
- The Heavy-Duty Pros: If you are prepping a massive commercial warehouse, you likely need a industrial-grade sprayer and a different formula. KILZ 3 is great for home life, but it isn’t meant for a skyscraper.
Comparison Context: KILZ 3 vs Other Primers
Choosing the right primer can feel like a guessing game. To make a confident choice, you need to know what you gain or lose with each can. Last month, I lined up a few different brands in my garage to see how they truly stack up.
KILZ 3 vs. Cheaper Latex Primers
I used a “budget” store-brand primer on a closet door once. It felt like watery milk.
- Coverage: KILZ 3 is much thicker. One coat of KILZ 3 did the work of three coats of the cheap stuff.
- Stain-Blocking: The budget primer let old smoke stains bleed through within an hour. KILZ 3 locked them down tight.
- Odor: Surprisingly, the cheaper one smelled more like chemicals. KILZ 3 is a more refined latex primer.
KILZ 3 vs. Oil-Based Primers
Oil-based options are the “nuclear” choice for stains, but they come with a cost.
- Cleanup: With KILZ 3, I just used the sink. With an oil-based primer, you need harsh thinners and smelly spirits.
- Safety: I didn’t get a headache using KILZ 3. Oil-based fumes can be very strong and linger for days.
- Dry Time: KILZ 3 is a quick-dry primer. It wins the speed race every time.
Manual vs. Sprayer Application
I tried a small hand sprayer for my kitchen cabinets. KILZ 3 is thick, so I had to thin it just a tiny bit with water. It sprayed evenly without clogging. If you use a roller, it still leaves a beautiful, level finish.
Pro Tip: Don’t just take my word for it.Check Reviews On Amazonto see how other DIYers handled their specific wall types!
Conclusion: Should You Buy KILZ 3?
After a full week of testing, here is my final verdict. I’ve lived with the results, and I’ve cleaned the brushes.
The Good and The Gritty
If you are someone who enjoys the process and loves seeing a perfect result, you will love this. It offers a sense of total satisfaction when a nasty water mark disappears.
It isn’t perfect, though. You have to deal with the scent. You have to be patient on humid days. You have to put in the hard work of prep. But for most home projects, the balance is just right.
My Final Take
I’ll be using KILZ 3 again for my next hallway project. It provides great paint adhesion and a silky finish that makes the topcoat pop. It turns a frustrating job into a win.
- Buy it if: You have stains to hide and want a smooth, professional look.
- Skip it if: You are in a zero-ventilation room or need a “one-hour” total project finish.
Take one last look at your walls. If they look a bit rough, Check Price On Amazon one last time. It’s a small investment that makes a massive difference in your home’s look and feel.
What surfaces can I use KILZ 3 on?
Drywall, wood, previously painted walls, and minor stains.
H3: How long does KILZ 3 take to dry?
Typically 30–60 minutes to touch, 2 hours before recoating.
H3: Do I need more than one coat?
Yes, for stubborn stains or dark colors, two coats are recommended.
H3: Is KILZ 3 water- or oil-based?
It’s a water-based primer, making cleanup easy with soap and water.
H3: Does it block tough stains?
Yes—smoke, water marks, crayon, and most common
Related posts:
 Zinsser BIN Shellac Base Primer Review (2026) – Best Primer for Stains & Odors?
 KILZ Original Reviews: Real-World Results, Stain Tests & What Nobody Tells You
 Does Zinsser Mold Killing Primer Block Stains? (2026) – What It Can and Can’t Do
 Best Deck Cleaner Before Staining (2026) – Remove Mildew, Dirt & Old Stains