To fix primer drips after drying, lightly sand the dripped area with fine-grit sandpaper until smooth and level with the surrounding surface. Wipe away dust with a damp cloth, then reapply a thin, even coat of primer, avoiding overloading the brush or spray. Allow the new coat to dry completely, and repeat sanding if necessary before painting. Proper technique and multiple light coats prevent future drips and ensure a smooth finish.
The Best Tools for Fixing Primer Drips
Since the most common mistake is using the wrong sandpaper or a dull scraper, these specific Amazon products are the perfect “fix-it” recommendations.
The Essential Tool Why It’s Best for Fixing Drips Key Feature Warner 2-Edge Carbide Scraper Precision Removal. Shaves the drip off without damaging the wall. Replaceable tungsten carbide blades. 3M Pro Grade Precision Sanding Sponges Contour Blending. Conforms to the wall for a seamless finish. 220-grit for smooth, no-scratch results. Bondo Glazing & Spot Putty Best for Gouges. If you accidentally nicked the wall while scraping. Fast-drying; sands easily in 20 minutes.
If you’ve ever asked yourself, How do I fix primer drips after drying?, you’re in the right place. I’ve repaired more sags and runs than I can count on walls, trim, cabinets, furniture, and even metal. In this guide, I’ll show you the exact steps, tools, and tricks I use on real jobs so you can get a flawless, pro-level finish without starting over.
Best Paint Primer – Expert-Recommended Primers for Every Surface
Why primer drips happen after drying
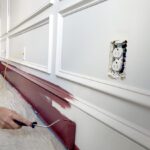
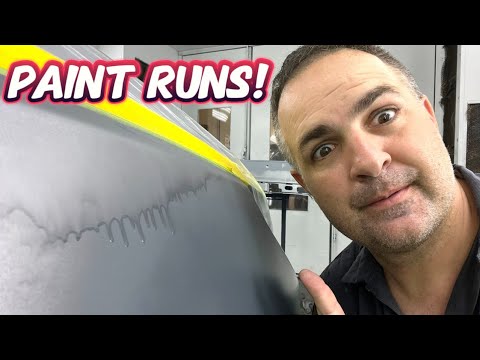
Primer drips form when too much product sits on the surface and starts to sag before it cures. This often comes from heavy coats, slow drying in cool or humid rooms, or using the wrong tip size or brush.
You’ll spot dried drips by using a raking light. Hold a bright light at a low angle and look for ridges and shiny runs. This quick check guides how aggressive you need to sand. When people ask, How do I fix primer drips after drying?, I always start with this simple inspection.
Tools and materials you need to fix primer drips after drying
Gather the right tools first. A good setup makes the repair fast and clean.
- Sharp razor or utility blade for shaving raised runs
- Sanding block or sponge to keep surfaces flat
- Sandpaper grits: 180 or 220 for leveling, 320 to 400 for feathering
- Wet/dry sandpaper for dust-free finish on trim and cabinets
- Vacuum with brush attachment and a tack cloth or microfiber towel
- Raking light or headlamp to spot defects
- Matching primer for spot-priming and a small brush or mini roller
- Lightweight spackle or glazing putty for any burn-through spots
- Respirator, safety glasses, and drop cloths for dust control
With these, you can answer How do I fix primer drips after drying? with calm and confidence.
Step-by-step: How do I fix primer drips after drying?
Follow these steps to remove runs while protecting the surface beneath.
- Confirm the primer is fully dry
- Check the can for dry and recoat times.
- Water-based primer often needs 1 to 4 hours, oil-based needs longer.
- Press a fingernail on a hidden spot. If it dents, wait more time.
- Shave high ridges
- For tall drips, hold a sharp razor almost flat to the surface.
- Gently shave the top of the drip. Use light passes.
- This cuts down the height before sanding and saves time.
- Sand the area level
- Start with 180 or 220 grit on a sanding block.
- Sand across the run with short, even strokes. Keep the block flat.
- Stop as soon as the ridge is level with the field.
- Feather-sand to blend
- Switch to 320 or 400 grit.
- Enlarge the sanded area a bit so the edge fades into the field.
- On trim and cabinets, wet sand to keep dust down and get a glassy feel.
- Clean and inspect
- Vacuum the area and wipe with a tack cloth.
- Use a raking light. If you see a low spot, fill it.
- Use a tiny bit of spackle or glazing putty, sand smooth, and recheck.
- Spot-prime and re-level
- Apply a thin coat of the same primer to the repair.
- Let it dry, then do a very light scuff with 320 grit if needed.
- If the spot looks flat under raking light, you’re ready for paint.
- Paint with care
- Use light coats and proper technique to avoid new runs.
- Follow the paint’s recoat time and keep the room within the right temperature and humidity.
Watch-outs
- Do not rush sanding if the primer feels rubbery.
- Do not oversand through to bare substrate. If you do, spot-prime the spot.
- Do not try to “blend” with a thick primer coat. Thin coats win.
Surface-specific tips for fixing primer drips after drying
Drywall and ceilings
Use a sanding block to keep the wall flat. Start with 220 and finish with 320. If you expose paper or joint compound, spot-prime those tiny burn-throughs before topcoat.
Trim, doors, and cabinets
Shave first, then wet sand with 320 or 400. Keep strokes with the grain. Tack off well. Spot-prime with a bonding primer for slick trim and allow full cure for a glassy finish.
Furniture and fine wood
Use a firm block and light passes. Wet sanding helps avoid swirl marks. If stain-grade wood shows, stop and re-prime that spot to prevent flashing.
Metal and automotive panels
Use wet/dry paper and a firm block to avoid waves. If you cut through to bare metal, apply a thin metal-rated primer right away to stop flash rust.
Sprayed primer drips
Runs from a sprayer are common with big tips or moving too slow. Level as above, then reduce gun pressure a bit, pick the right tip, and keep your passes even.
Many readers still ask, How do I fix primer drips after drying on trim versus walls? The core steps are the same, but trim needs finer grits and cleaner dust control.
Prevention: avoid primer drips next time
- Apply thin coats. Two light coats beat one heavy coat.
- Mind temperature and humidity. Cool, damp rooms slow dry time and cause sags.
- For brushing, load the brush halfway, tap excess, and lay off gently.
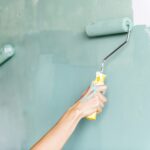
- For rolling, use the right nap. Foam or 1/4-inch nap reduces overload on smooth doors and cabinets.
- For spraying, use the correct tip size and stand the right distance. Keep a steady speed and a 50 percent overlap.
- Stir primer well. If thinning is allowed by the label, only thin as directed.
- Always use a raking light. It reveals sags before they set.
If you’re wondering, How do I fix primer drips after drying so they never return?, prevention is the real secret.
Troubleshooting and common mistakes
Common mistakes
- Sanding before full cure, which gums paper and tears the film
- Skipping a sanding block and creating waves or divots
- Spot-priming too heavy and causing a new sag
- Painting without a dust-free wipe-down, which makes nibs and bumps
Pro checks
- Use a headlamp at a low angle to spot flaws fast.
- Mark defects with a pencil dot, fix them, then erase with a light sand.
- Keep fresh paper. Dull paper polishes defects instead of cutting them.
PAA-style quick answers
Can I paint over primer drips?
You can, but you will see the drip through the paint. Level it first for a smooth finish.
What grit sandpaper works best?
Start with 180 or 220 to knock down the ridge. Finish with 320 to 400 to feather and blend.
Is wet sanding better than dry sanding?
On trim and cabinets, yes. Wet sanding controls dust and leaves a smoother surface. On drywall, stick with dry sanding and a vacuum.
When clients ask, How do I fix primer drips after drying without making a bigger mess?, I point them to these steps and tools. They work every single time.

Pro tips from the field
- Treat runs like speed bumps. Shave the high spot, then sand. Do not grind the whole area.
- Replace the razor often. A fresh blade cuts clean and reduces scratches.
- Use a light “guide coat.” A quick dusting of a contrasting color shows highs and lows when you sand.
- Work small. Fix one run at a time so you do not over-sand the field.
- Keep a calm pace. The fastest way to fix primer drips is to not rush.
I learned this the hard way on a cabinet job. I tried to buff a big sag with 220 only and ended up chasing a low spot across a door. Now I always shave first, sand with a block, feather with 400, and spot-prime. That simple change cut my rework time in half.
Frequently Asked Questions of How do I fix primer drips after drying?
How long should I wait before fixing primer drips?
Wait until the primer is fully dry and firm to the touch. Follow the label, and add extra time in cool or humid rooms.
Can I use a heat gun to speed up drying?
It is risky because heat can skin the surface and trap solvents. Let it dry at room conditions for a stable film.
What if I sand through to bare drywall or wood?
Spot-prime those areas before painting. This seals the surface and prevents flashing or soak-in.
Do I need to re-prime the whole wall after fixing runs?
No, only spot-prime the repaired areas. Blend and scuff if needed to keep a uniform finish.
Will a second coat of primer hide the drips?
No. Thick coats make runs worse. Level the drips first, then apply thin, even coats.
How do I fix primer drips after drying on a door with panels?
Shave and sand the run, staying with the grain and profile lines. Feather with 320 to 400, spot-prime, and keep coats thin on edges.
Is dust protection necessary for small fixes?
Yes. Even small sanding creates fine dust. Use a vacuum, wear a mask, and tack off before re-priming.
Conclusion
You can fix dried primer drips with a simple plan: let it cure, shave the ridge, sand in steps, clean, spot-prime, and repaint. With the right tools, light pressure, and a raking light, your repair will blend so well no one will ever know.
Try the method today on a small run and build your confidence. If this helped answer How do I fix primer drips after drying?, share it with a friend, subscribe for more pro tips, or drop your questions in the comments.