Sand below the craters, reprime if needed, slow the reducer, and repaint after full flash.
If you want to know how to fix solvent pop in paint with clear, simple steps that actually work, you are in the right place. I’ve repaired this defect on show cars, daily drivers, and cabinets. You will learn what causes pops, how to fix them fast, and how to stop them from coming back. Stick with me, and you will master how to fix solvent pop in paint the right way.
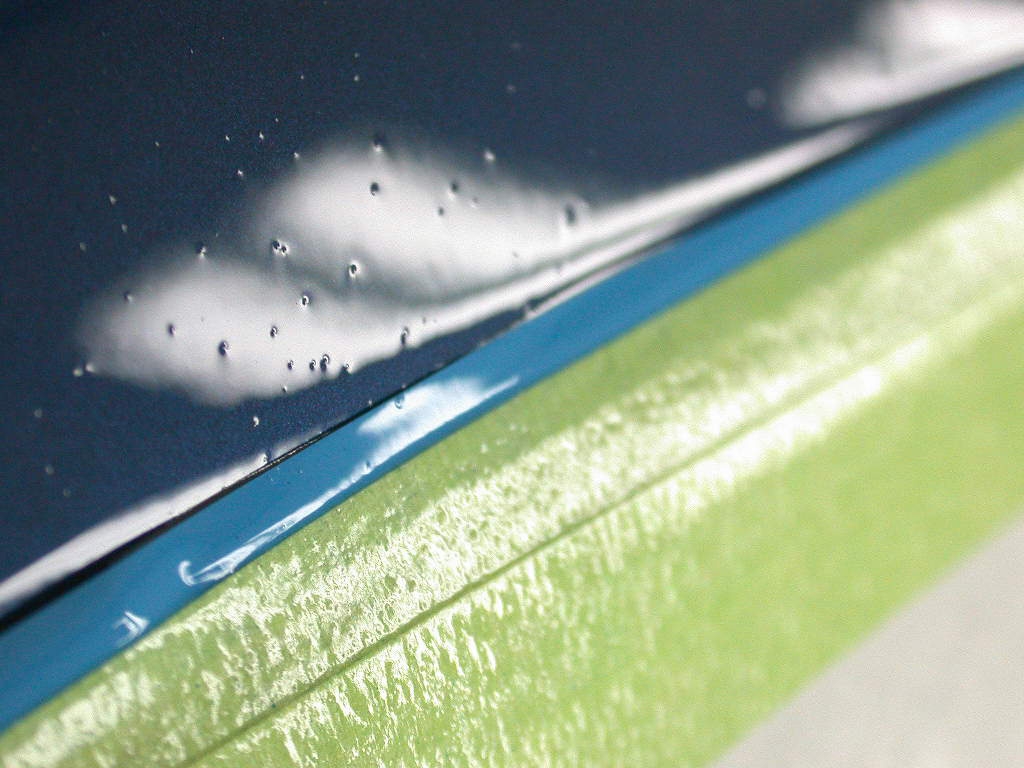
What solvent pop is and why it happens
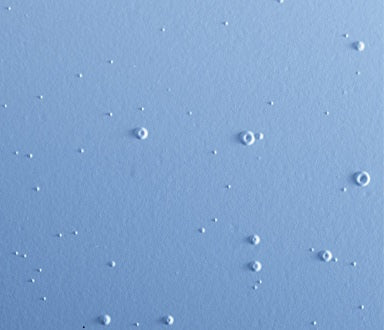
Solvent pop looks like small craters, pinholes, or tiny volcanoes in the paint film. They often show up after the coat skins over but the solvent under it is still trapped. As the trapped solvent tries to escape, it bursts through and leaves a hole.
This happens when coats go on too heavy, flash times are too short, or the reducer is too fast for the booth or weather. A hot panel, strong bake too soon, or poor airflow can make it worse. Wrong gun settings or water and oil in the airline can also add to the problem.
Before you focus on how to fix solvent pop in paint, confirm the defect. Fisheyes have sharp round edges and come from silicone or oil. Dust nibs sit on top and feel like grit. Pinholes from filler outgassing sit deeper and may trace back to bodywork.
Best Brush for Emulsion Paint: Painters Swear by This One
Safety, tools, and materials you will need
Work safe first. Paint and solvents are no joke. Use the right gear and a clean setup.
Safety
- Organic vapor respirator with fresh cartridges
- Nitrile gloves, eye protection, spray suit or coveralls
- Good ventilation or a paint booth
Tools
- Dual-action sander with interface pad
- Sandpaper: P180–P320 for deep defects, P400–P600 for primer, P800–P1200 for clear scuff
- Sanding block, guide coat, tack cloths
- Air blow gun with clean, dry air
- Mixing cups, strainers, stir sticks, timers, temperature and humidity gauge
- Spray gun 1.3–1.4 mm for base and clear, regulator and gun gauge
- IR lamp or controlled bake unit if available
Materials
- Wax and grease remover and clean lint-free wipes
- 2K primer surfacer and/or sealer
- Basecoat, clearcoat, correct hardener, slower reducer or retarder as needed
- Polishing compound, P1500–P3000 finishing discs for denib and polish
If you plan how to fix solvent pop in paint at home, control your air. Use a dryer, water trap, and oil separator. Strain every product before it hits the cup.
Step-by-step: how to fix solvent pop in paint
This is the core process I use in the shop. It works for small areas and full panels.
- Inspect and map the damage
- Wash and degrease to remove wax and silicone.
- Use a bright light and a magnifier to spot the depth of the craters.
- If pops are only in the clear, the fix is faster. If they reach base or primer, plan to refinish those layers.
- Sand out the craters
- Shallow pops in clear: Spot-sand with P800–P1200 until the crater edges vanish. Keep the surface even.
- Deep pops: DA sand with P320–P400 to remove all defects. Feather edges smooth. Use a guide coat to track highs and lows.
- Reprime and block if needed
- If you break through clear or into base, apply 2–3 coats of 2K primer surfacer.
- Let it flash per the TDS. At 70°F, many primers need 10–15 minutes between coats.
- Block sand with P400–P600 flat and clean. Apply a thin sealer coat if color holdout is a concern.
- Reapply basecoat
* Mix by the book. Strain the paint. Use the right reducer grade for your booth temp.
- Spray light to medium first coat. Let it lose the wet gloss. That dull, even look is your flash cue.
- Apply the next coat only after full flash. Add a drop of retarder for hot or tight areas.
- Clearcoat with control
- First coat medium-wet, not heavy. Think coverage, not glass.
- Follow TDS flash times. If in doubt, add time. Cool, humid days need longer flash.
- Use a slower reducer or add retarder to stop skinning on top while solvents escape from below.
- Airflow and bake
- Use steady, clean airflow. Do not blast the surface.
- Avoid hard bake too soon. If you bake, allow a longer ambient flash first, then ramp heat up.
- IR can help pull solvents out, but do not cook the surface skin.
- Cure, denib, and polish
- Let the film cure as long as the TDS allows. Overnight is a safe bet in most cases.
- Wet sand dust nibs with P1500–P3000 and polish to gloss. Do not cut into the base.
- Final checks
- Wipe with 1:1 IPA and water to preview final gloss. Check under different lighting.
- If you still see pops, you did not sand past the crater edge. Go back to step 2.
If you asked me how to fix solvent pop in paint in one line, I would say: remove the defect fully by sanding, slow the system down with correct reducer and flash, and rebuild with thin, even coats. That keeps solvents moving out, not trapped in.
Root causes and how to control them
Knowing how to fix solvent pop in paint is easier when you remove the trigger. These are the usual suspects and their cures.
Spraying too heavy
- Cause: Thick wet coats skin on top and trap solvent.
- Fix: Target medium-wet first coat. Reduce overlap or fluid. Add one more light pass instead of one heavy pass.
Short flash time
- Cause: Next coat hits before the last one vents.
- Fix: Use a timer. Wait until the coat loses gloss. Add time in cool or humid weather.
Wrong reducer or hardener speed
- Cause: Fast materials in a warm booth skin the surface.
- Fix: Match the product speed to booth temp. Use a slower reducer or add retarder in heat.
Hot panels or hot booth
- Cause: Heat speeds skinning. Solvents boil under the film.
- Fix: Let panels cool. Avoid direct sun. Ramp bake temps after a long flash.
Poor airflow or dirty air
- Cause: Stagnant air slows solvent release. Water or oil makes defects worse.
- Fix: Ensure booth flow is steady and balanced. Use dryers and filters. Purge the line.
Wet sealer or thick primer
- Cause: Undercoats still flashing push gas up.
- Fix: Respect TDS film builds. Let undercoats vent. Light sealer is enough.
Wrong gun setup or technique
- Cause: Too close, too slow, or low pressure builds film fast.
- Fix: Set fan and pressure per TDS. Hold 6–8 inches off the panel. Keep a steady pace.
Product stacking or contamination
- Cause: Incompatible coats or silicone on the surface.
- Fix: Follow one system. Clean well. Use wax and grease remover and fresh tack rags.
Control these points and you will not only learn how to fix solvent pop in paint, you will stop it from showing up again.

Prevention checklist and best practices
Use this quick list on every job.
- Read the TDS for mix, pot life, flash, and film build.
- Check booth temp and humidity. Choose reducer speed to match.
- Strain every mix. Keep lids on. Label cups with time and coat count.
- Spray a medium first coat. Watch for dull flash before the next coat.
- Keep gun distance and pace steady. Do a test spray on a card first.
- Let sealer and base vent longer in tight spots and edges.
- Avoid hard bake right away. Use a longer flash or a warm ramp.
- Keep air lines dry. Purge the hose. Change filters on schedule.
- Record settings on a job card to repeat success or spot errors.
Follow this, and you will rarely need to ask how to fix solvent pop in paint again.

Real-world examples and lessons learned
A black hood came in with hundreds of tiny pops. The last shop had laid two heavy clear coats and baked right away. I sanded to remove every crater, applied two light coats of primer, let it sit for 45 minutes, then sealed, based, and cleared with a slower reducer. I doubled the flash between clear coats and skipped the bake. The finish laid flat and held up through a summer of heat.
On a motorcycle tank, the pops hid in a candy layer. The fix was slow and careful. I sanded past each crater, reshot the midcoat in light passes, and used extra flash. I also used a retarder in the clear. The lesson: thin coats, long flash, and patience. If you rush, you repeat. This is the heart of how to fix solvent pop in paint without a redo.
Quality control and cure validation
You need proof your fix will last.
- Solvent wipe preview: A light 1:1 IPA and water wipe will mimic final gloss. Look for any ghost craters.
- Adhesion check: A gentle crosshatch and tape pull on a masked test patch shows if layers bonded well.
- Heat cycle: Let the panel warm and cool once. Watch for new pops. If none appear, the film vented right.
- Recordkeeping: Note temp, reducer, flash times, and gun settings. This helps repeat good results.
These simple checks close the loop on how to fix solvent pop in paint and keep quality high.
Frequently Asked Questions of how to fix solvent pop in paint
What causes solvent pop in fresh clear?
Heavy coats, short flash, and fast reducer trap solvent under a skin. Heat or early bake then forces the gas out and leaves craters.
Can I wet sand and buff to fix solvent pop?
Only if the pops are shallow in the clear. If the craters reach base or primer, you must sand deeper, reprime, and repaint.
Which reducer speed helps prevent pops?
Use a reducer that matches booth temperature. In warm conditions, choose a slower reducer or add retarder to slow skinning.
How long should I wait between clear coats?
Wait until the coat loses its wet gloss and looks evenly dull. Many clears need 10–20 minutes at 70°F, but follow the TDS.
Is baking right after clear a bad idea?
A hard bake too soon can make pops worse. Allow a longer ambient flash, then ramp heat slowly if you plan to bake.
Can contamination cause something that looks like solvent pop?
Yes. Water, oil, or silicone can create defects that mimic pops. Clean well, filter your air, and use fresh tack cloths.
What grit should I start with to remove deep pops?
Start around P320–P400 to get below the crater edges. Then refine to P600 before sealer and base.
How do I know if I removed the crater fully?
Use a guide coat and bright light. If any dark rim or shadow remains, you have not sanded past the defect.
Will adding more clear on top hide solvent pop?
No. Extra clear will not fill true craters cleanly and can trap more solvent. Remove the defect first, then refinish.
What is the quickest way to fix solvent pop on a small spot?
Spot-sand below the craters, scuff around the area, then re-clear with proper flash. Use a slower reducer for control.
Conclusion
Solvent pop is a trapped solvent problem, not a polishing problem. Slow down the system, respect flash times, and spray thin, even coats. Remove every crater before you rebuild, and the finish will last.
Start small: fix a test panel using the steps above. Log your temps, reducer choice, and flash times. When it looks right, repeat that setup on the car. If this helped, share your results or ask a question so we can dial in your next job together.