Primer should be applied in a thin, even coat rather than thick layers. A thin coat allows proper adhesion, faster drying, and better bonding between the surface and the topcoat, while thick primer can lead to drips, uneven texture, or poor curing. If needed for coverage, it’s better to apply two light coats instead of one heavy coat. Following the manufacturer’s recommended application method ensures the best paint results.
Top Products to Get the Perfect Primer Consistency
If your primer is too thick (common with older cans) or you’re using a sprayer, you’ll need these specific tools to get the finish right.
Product Why it’s the Best for Primer Key Feature Floetrol Paint Conditioner Best for Thinning. Thins water-based primer without losing “stick.” Eliminates brush and roller marks. Wagner SprayTech Viscosity Cup Best for Accuracy. Tells you exactly how thin your primer is. Essential for professional spray finishes. Wooster Pro Woven Roller Cover Best for Thick Primers. Manages thicker primers without shedding. High-capacity fabric for smooth release.
What Is Primer and Why Thickness Even Matters
I used to think of primer as just “cheap white paint” that I had to slap on before the real fun started. One humid Saturday in my old fixer-upper, I tried to skip the prep and just globbed it on. I learned the hard way that primer isn’t just an extra step—it is the secret glue that holds your project together. If you get the thickness wrong, your expensive topcoat won’t stand a chance.
What Primer Actually Does (Beyond Just Sticking Paint)
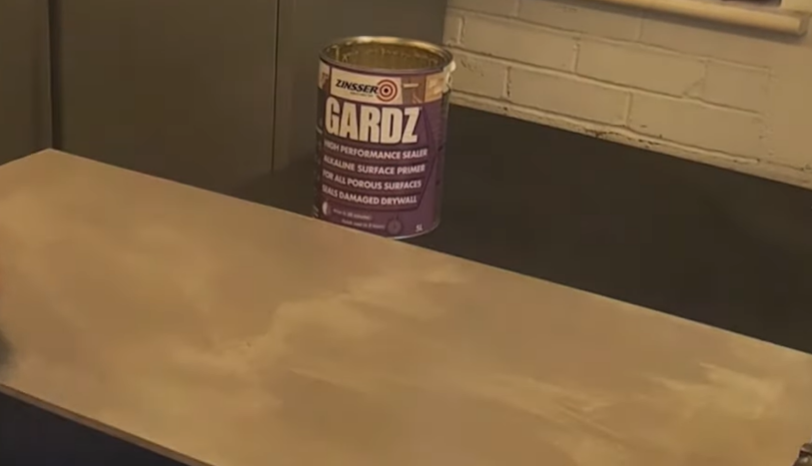
In my early DIY days, I’d see pros reaching for a can of Zinsser or Kilz and wonder why they didn’t just use two coats of color. After a few peeling-paint disasters, I finally realized that primer does the heavy lifting behind the scenes.
- Improves paint adhesion: It acts like double-sided tape. Whether you use a latex primer for drywall or a bonding primer for slick surfaces, it gives the paint something to grab onto.
- Seals porous surfaces: If you’ve ever painted bare drywall, you know it drinks paint like a sponge. A good drywall primer stops that soak-up so your color stays on top.
- Blocks tough stains: I once tried to paint over a water leak spot without a shellac primer. Big mistake. The yellow stain bled through three coats of white! Now, I use an oil-based primer for smoke or tannin bleed.
- Creates a uniform base: It hides those ugly patches of drywall mud and sanding dust. It gives you one smooth, flat color to start with.
- Enhances durability: When the base is solid, your walls can handle the bumps and scuffs of daily life much better.
Getting the thickness right is the difference between a pro finish and a sticky mess that never seems to dry.
Applied Primer Too Thick: What Happens? Problems & Fixes Explained
Should Primer Be Thick or Thin? The Short Answer
I remember a sticky, humid Saturday in July when I was rushing to finish a guest bedroom. I figured I’d save time by slathering on a heavy layer of primer. I thought, “Thicker means better coverage, right?”
I was wrong. By lunchtime, my walls looked like they were melting. I learned that day that primer should be even, not heavy. If you want a professional look, you have to resist the urge to glob it on.
The Ideal Primer Coat Thickness
So, how thick should primer be? The sweet spot is a thin to medium coat. You want just enough to hide the old surface without creating new problems.
- Total Coverage: The coat should cover the surface fully. You shouldn’t see “holidays” or missed spots.
- No Pooling: It should never collect in corners or grooves.
- Zero Drips: If it starts to sag or run, your proper primer application thickness is way off.
- Smooth Leveling: A good coat should lay flat. It should look like a soft, matte skin, not a bumpy orange peel.
Why Thick Primer Is a Problem
Whenever I see a thick, goopy mess on a wall, I know a headache is coming. Applying it too heavy causes a chain reaction of DIY disasters.
- Slow Drying: It stays wet for ages. You’ll be waiting all day just to touch it.
- Cracking and Peeling: When the top “skins” over but the bottom stays wet, the paint eventually splits or flakes off.
- Ugly Marks: You will see every single brush stroke and roller ridge.
- Poor Adhesion: A thick layer often fails to “bite” into the wall, leading to a weak paint bond.
Why Too Thin Isn’t Great Either
On the flip side, being too stingy with your primer creates its own set of chores.
- Uneven Sealing: The surface stays “thirsty.” It will soak up your expensive topcoat unevenly.
- Flashing: This is when you see dull or shiny patches through your final paint. It looks messy under bright lights.
- Extra Work: If the first layer is too thin, you’ll end up doing three coats instead of one.
The goal is a balanced, uniform layer that feels smooth to the touch once dry.
How Thick Should Primer Be (By Surface Type)
I used to think one rule worked for every wall. Then I tried to prime my kitchen cabinets the same way I did my garage, and it was a total mess. How thick should primer be? Well, it really depends on what you are painting. A thirsty piece of new wood needs a different touch than a wall you painted just last year.
Drywall (New Construction or Repairs)
When I first tackled new drywall, I was shocked at how fast the paper “drank” the liquid. It is like a dry sponge. For this, I use a medium coat. You need enough to seal the surface porosity and hide the drywall mud on the seams.
If you go too thin here, the sanding dust might mix with your paint and look gritty. I usually do one solid coat, but if the wall still looks patchy, I go for a second.
Wood (Bare or Stained)
Bare wood is tricky. One time, I used a water-based primer on a pine shelf and the grain puffed up like a cat’s fur. Now, I always use a thin, even coat.
If you see dark knots in the wood, don’t just pile on more primer. That won’t work. Instead, use a thin layer of oil-based primer or shellac. This stops the “bleed” without making the surface goopy.
Previously Painted Walls
This is the easiest job. If the old paint is in good shape, you only need a thin bonding coat. You aren’t trying to build up a thick layer. You are just creating a “bridge” for the new color. I focus on getting full coverage so the old color doesn’t peek through, but I keep the layer very light.
Cabinets and Trim
I learned my lesson here the hard way. Heavy primer on cabinet edges will drip and dry into hard “icicles.” For cabinets, I only do very thin coats.
It is much better to do two thin layers than one thick one. I always sand lightly between these layers with a fine pad. This keeps the finish as smooth as glass and ensures a strong paint bonding result.
Applied Primer Too Thin? – Signs, Problems & Easy Solutions
Thin vs Thick Primer Coat – A Side-by-Side Comparison
If you have ever stood in a dark room at 9 pm, watching a glob of white primer drip slowly down your wall, you know the pain. You’re tired, your back hurts, and now you have a mess to fix. I used to think a heavy layer would save me time. Instead, it just gave me a long night of fixing runs. When we look at a thin vs thick primer coat, the winner is clear every single time.
Thin Coat Characteristics
In my shop, I always aim for “thin and steady.” It might feel like you aren’t doing enough, but this is where the magic happens for your DIY home improvement project.
- Dries in a Flash: A thin layer lets the moisture escape fast. You can often recoat in an hour.
- Levels Like a Dream: It lays flat on the wall. You won’t see those annoying roller marks later.
- Less Work: Because it dries flat, you barely have to sand. This saves your arms from a lot of ghost-white dust.
- Pro Results: It creates a tight, even bond that makes your topcoat look like it was done by a master.
Thick Coat Characteristics
I’ve been the person who globs it on because I was in a rush. Trust me, it’s a trap. A thick coat feels productive, but it’s actually a recipe for a redo.
- Drips and Sags: It’s too heavy for the wall to hold. You’ll get “curtains” of dried paint that look terrible.
- Longer Cure Time: The surface feels dry, but the middle is still soft. If you paint over it too soon, the whole thing might slide off.
- Risk of Peeling: Thick layers often struggle with paint bonding. They tend to pull away from the wall in big sheets.
- Uneven Texture: You’ll end up with a bumpy surface that looks like an orange peel. No amount of paint can hide that.
Can You Apply Primer Too Thick? (Yes — Here’s What Happens)
I get it. You load the roller and it feels great to see that dark wall disappear in one pass. It feels productive, like you are winning. But I’ve learned the hard way that primer is not frosting on a cake. When I tried to “shortcut” a hallway project last spring by gooping it on, I ended up with a mess that took twice as long to fix.
Signs You Applied Primer Too Thick
If you are worried you went a bit too heavy, look for these red flags. I’ve seen them all on my own walls after a long day of DIY:
- Visible Drips: These “curtains” of paint start to slide down the wall as it sits.
- Soft Spots: If the wall still feels tacky or squishy hours later, the primer drying time is stuck.
- Peeling: I once tested a dry-looking spot with my fingernail, and the whole layer peeled off like a sticker. That means it never bonded to the wall.
- Bubbling: Heavy coats trap air. You will see tiny blisters pop up as the gases try to escape.
How to Fix Over-Applied Primer
Don’t panic. I have been there, standing in my paint-speckled socks, wondering if I ruined the room. You can fix it, but you have to be patient.
- Let it fully dry: Do not touch it while it is wet. You will only make the texture worse. Give it a full day.
- Sand it smooth: Grab some 220-grit sandpaper. Lightly sand away the drips and bumps until the wall feels flat.
- Clean the surface: Use a tack cloth to wipe away every bit of dust. You need a clean base for the next step.
- Reapply a thin coat: This time, keep it light. Focus on an even layer that helps with paint adhesion rather than bulk.
Getting it right the first time is better, but sanding is a great teacher!
How Many Coats of Primer Are Needed?
In my experience, one good coat usually beats two rushed ones. I used to think I had to prime everything twice just to be safe. But after years of DIY home improvement, I’ve found that the “right” number of coats depends on the mess you are trying to hide. Sometimes you can be done in an hour, and other times, you’ll be at it all weekend.
When One Coat Is Enough
Most of the time, you can get away with just one layer. If the wall is already in good shape, don’t overthink it. One coat works best when:
- Repainting similar colors: If you are going from a light tan to a soft grey, one pass is plenty.
- Minor surface repairs: Small scuffs or tiny nail holes don’t need much help.
- Using quality primer: If you use a high-adhesion product, it will create a strong paint bond in one go.
When Two Coats Are Better
There are days when one coat just looks “sad.” You can see the old life of the room peeking through. That is when I reach for the roller again. Two coats are a must for:
- Dark to light changes: If you are painting over a deep navy wall, that first coat will look streaky. The second coat builds the base.
- Bare drywall patches: New mud is very thirsty. The first coat sinks in, and the second coat actually seals the surface porosity.
- Stained areas: For light water spots or scuffs, two layers ensure the marks won’t “ghost” through your topcoat.
- Glossy surfaces: Slick walls need more “grip” to help with paint adhesion.
Rare Case: Three Coats
I try to avoid three coats if I can. It is a lot of work! But sometimes, a wall has a rough history. You might need a third pass for:
- Severe water damage: Deep brown rings can be stubborn.
- Smoke stains: Nicotine or fire damage smells and bleeds. You need a thick barrier.
- Knotty wood: If you see sap or tannins bleeding through, you have to seal it tight.
Learning to judge the wall after the first coat dries is a pro skill. If it looks even and flat, you are ready for color!
Proper Primer Application Thickness (Step-by-Step Guide)
I’ve had my share of messy learning days and paint-speckled socks. After a few failed attempts, I finally found a rhythm that works. This is the exact method I use now to get a perfect finish every time. If you follow these steps, you won’t have to worry about ugly drips or bumpy walls.
Step 1 – Stir, Don’t Shake
When I first started, I used to shake the can like a protein drink. That was a mistake. Shaking creates tiny air bubbles that ruin your smooth finish. Now, I use a wooden stick to stir slowly. This gives me a consistent texture without the foam. It ensures the solids at the bottom mix well with the liquids on top.
Step 2 – Load the Roller Correctly
I used to dunk the whole roller into the tray. It felt fast, but it just made a mess. Now, I dip just a bit and roll it back and forth on the tray’s ramp. You want even saturation, not a soaking wet sponge. A dripping roller is a sign of trouble. If it’s too heavy, you’ll never get the proper primer application thickness.
Step 3 – Apply in a “W” Pattern
This is the best trick I ever learned. Start by drawing a large “W” on the wall about three feet wide. Then, fill in the gaps without picking up the roller. This spreads the product evenly across the surface. Once the “W” is filled, I “back-roll” by lightly going over the area in long, straight vertical strokes. This levels everything out and keeps a wet edge, which prevents those nasty roller marks.
Step 4 – Check Under Light
Before I call it a day, I grab a work light. I hold it close to the wall at an angle. This helps me spot any thin patches where the surface porosity is still showing. It also helps me catch drips before they dry. If I see a sag, I can smooth it out quickly. It only takes a minute, but it makes the final topcoat look so much better.
Common Primer Thickness Mistakes (And How to Avoid Them)
Most primer problems aren’t actually failures of the product. Usually, they come down to our own application habits. I’ve had days where I was tired and just wanted to be done. Those are the days I made the most messes. Trust me, it is much easier to fix a habit than it is to sand down a whole room of dried drips.
Overloading the Roller
This is the most common trap. You want to see that wall change color fast, so you soak the roller until it’s heavy. When I do this, I hear a distinct “slapping” sound against the wall. That’s the sound of too much liquid. It leads to thick ridges and splatters. Instead, keep your roller light. It should move quietly and smoothly across the surface.
Skipping Surface Prep
I once tried to prime a dusty wall in a rush. The primer mixed with the grit and created a thick, sandy paste. It looked awful. Good surface preparation is the only way to keep your coat thin and even. Always wipe the walls down first. If the primer has to fight through dust, it won’t lay flat, and your paint bonding will suffer.
Painting in High Humidity
I’ll never forget trying to prime a ceiling on a day when the air felt like a wet blanket. The sticky air slowed the primer drying time to a crawl. Because it stayed wet so long, the primer started to sag under its own weight. If the air is thick with moisture, wait for a dry day or turn on the AC. It makes a huge difference in how the coat settles.
Not Respecting Dry Time
The smell of oil primer in a closed room can be strong, and it’s tempting to open a window and just start the topcoat. I’ve made the mistake of painting over “dry-to-the-touch” primer that was still soft underneath. The roller literally dragged across the surface with a sticky, tearing sound. You must let the primer fully cure. If you rush it, you’ll just pull the primer right off the wall.
Expert Tips for Getting Primer Just Right
After years of weekend projects—and one regrettable navy-to-white repaint in my first apartment—I’ve learned a few things. I used to think I could just “wing it,” but primer is picky. If you want that smooth, pro look without the stress, here is what actually works for me.
Use the Right Nap Roller
The fuzzy part of your roller is called the nap. Picking the wrong one is a mistake I made for years. For smooth walls, I use a 3/8″ nap. It holds just enough liquid to be even. If you are working on a bumpy or textured wall, go for a 1/2″ nap. It gets into the deep spots so you don’t have to push too hard.
Follow Manufacturer Spread Rate
Check the back of the can! Most labels tell you how many square feet a gallon covers. I used to ignore this. Now, I use it as a guide to avoid over-application. If you are using way more than the can suggests, your coat is likely too thick. Keeping an eye on this ensures perfect paint bonding and saves you money.
Don’t Rush the Topcoat
I know the feeling. You want to see the new color on the walls before the sun goes down. But rushing is the fastest way to ruin your hard work. The primer must fully cure. If it still feels cool or tacky, wait! I also like to do a very light sanding with a fine pad once it is dry. This tiny step removes any stray dust and makes your final coat look like a million bucks.
Final Thoughts on Primer Coat Thickness
If you remember just one thing from my messy weekends, let it be this: primer should look boring. It should be smooth and even with no drama. I used to want a big change right away. Now, I know that a quiet, flat base is what makes the final color pop. When I look back at my old house projects, the best rooms were always the ones where I took my time with the prep.
The Rule of Thumb
After years of trial and error, I live by a simple rule. It keeps my stress low and my walls looking great. It is all about balance.
- Thin enough to level: You want the liquid to lay flat. It should fill in the tiny gaps in the surface porosity without leaving bumps.
- Thick enough to cover: You should not see streaks of the old wall. One even pass is usually the goal.
- Never dripping: If you see a run or a sag, you have gone too far. Stop and spread it out before it dries.
Getting the paint bonding right doesn’t have to be a chore. Just keep your coats light and your patience high. Your walls will thank you, and your topcoat will look like it was done by a pro.
Frequently Asked Questions
Q: Can I just use two coats of paint instead of primer? A: No. Paint adds color, but primer provides paint adhesion. Skipping it often leads to peeling, especially on new drywall or wood.+1
Q: How long should I wait for primer to dry before painting? A: Most latex primers dry in 1 hour, but check the can. High humidity can double this time. It must feel dry and “hard” to the touch, not tacky.
Q: Should I sand the primer before the topcoat? A: Yes, a light scuff with 220-grit sandpaper is best. It removes tiny dust nibs and creates a smoother surface for your final color.
Q: Do I need to prime previously painted walls? A: Only if you are making a big color change (dark to light) or if the old paint is glossy. Otherwise, a good cleaning is often enough.
Q: What happens if the primer coat is too thin? A: You will see “flashing” or uneven shiny spots in your topcoat. If you can see the old wall color clearly through the primer, add one more thin layer.
Q: Is Kilz or Zinsser better? A: Both are excellent. Kilz is famous for blocking heavy stains and odors, while Zinsser is often preferred for its incredible bonding on slick surfaces like tile or cabinets.
Related posts:
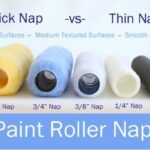 Thick Vs Thin Roller Nap– Expert Tips for Smooth, Even Paint Coverage
 Zinsser Gardz vs Peel Stop (2025) – Which Primer Works Best for Problem Walls?
 Best Paint for Kitchen Cabinets Without Sanding – No Prep, No Mess, Long-Lasting Results | Expert Tested
 How To Remove Old Emulsion Paint From Walls? – Safe Methods That Actually Works