What Nap Roller To Use On Popcorn Ceiling?
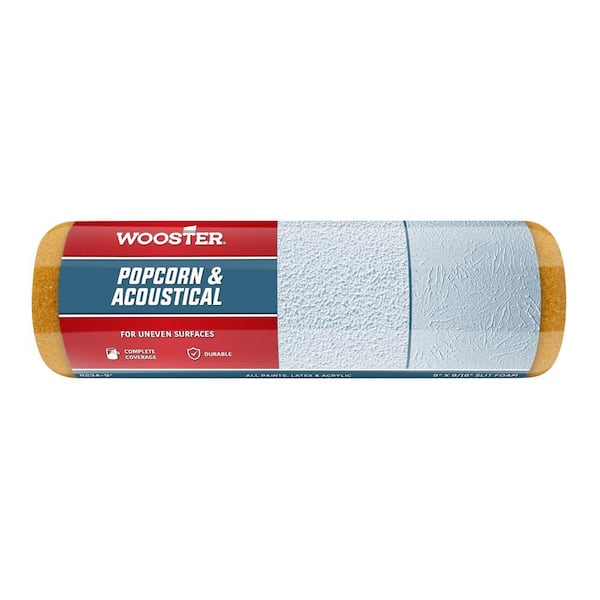
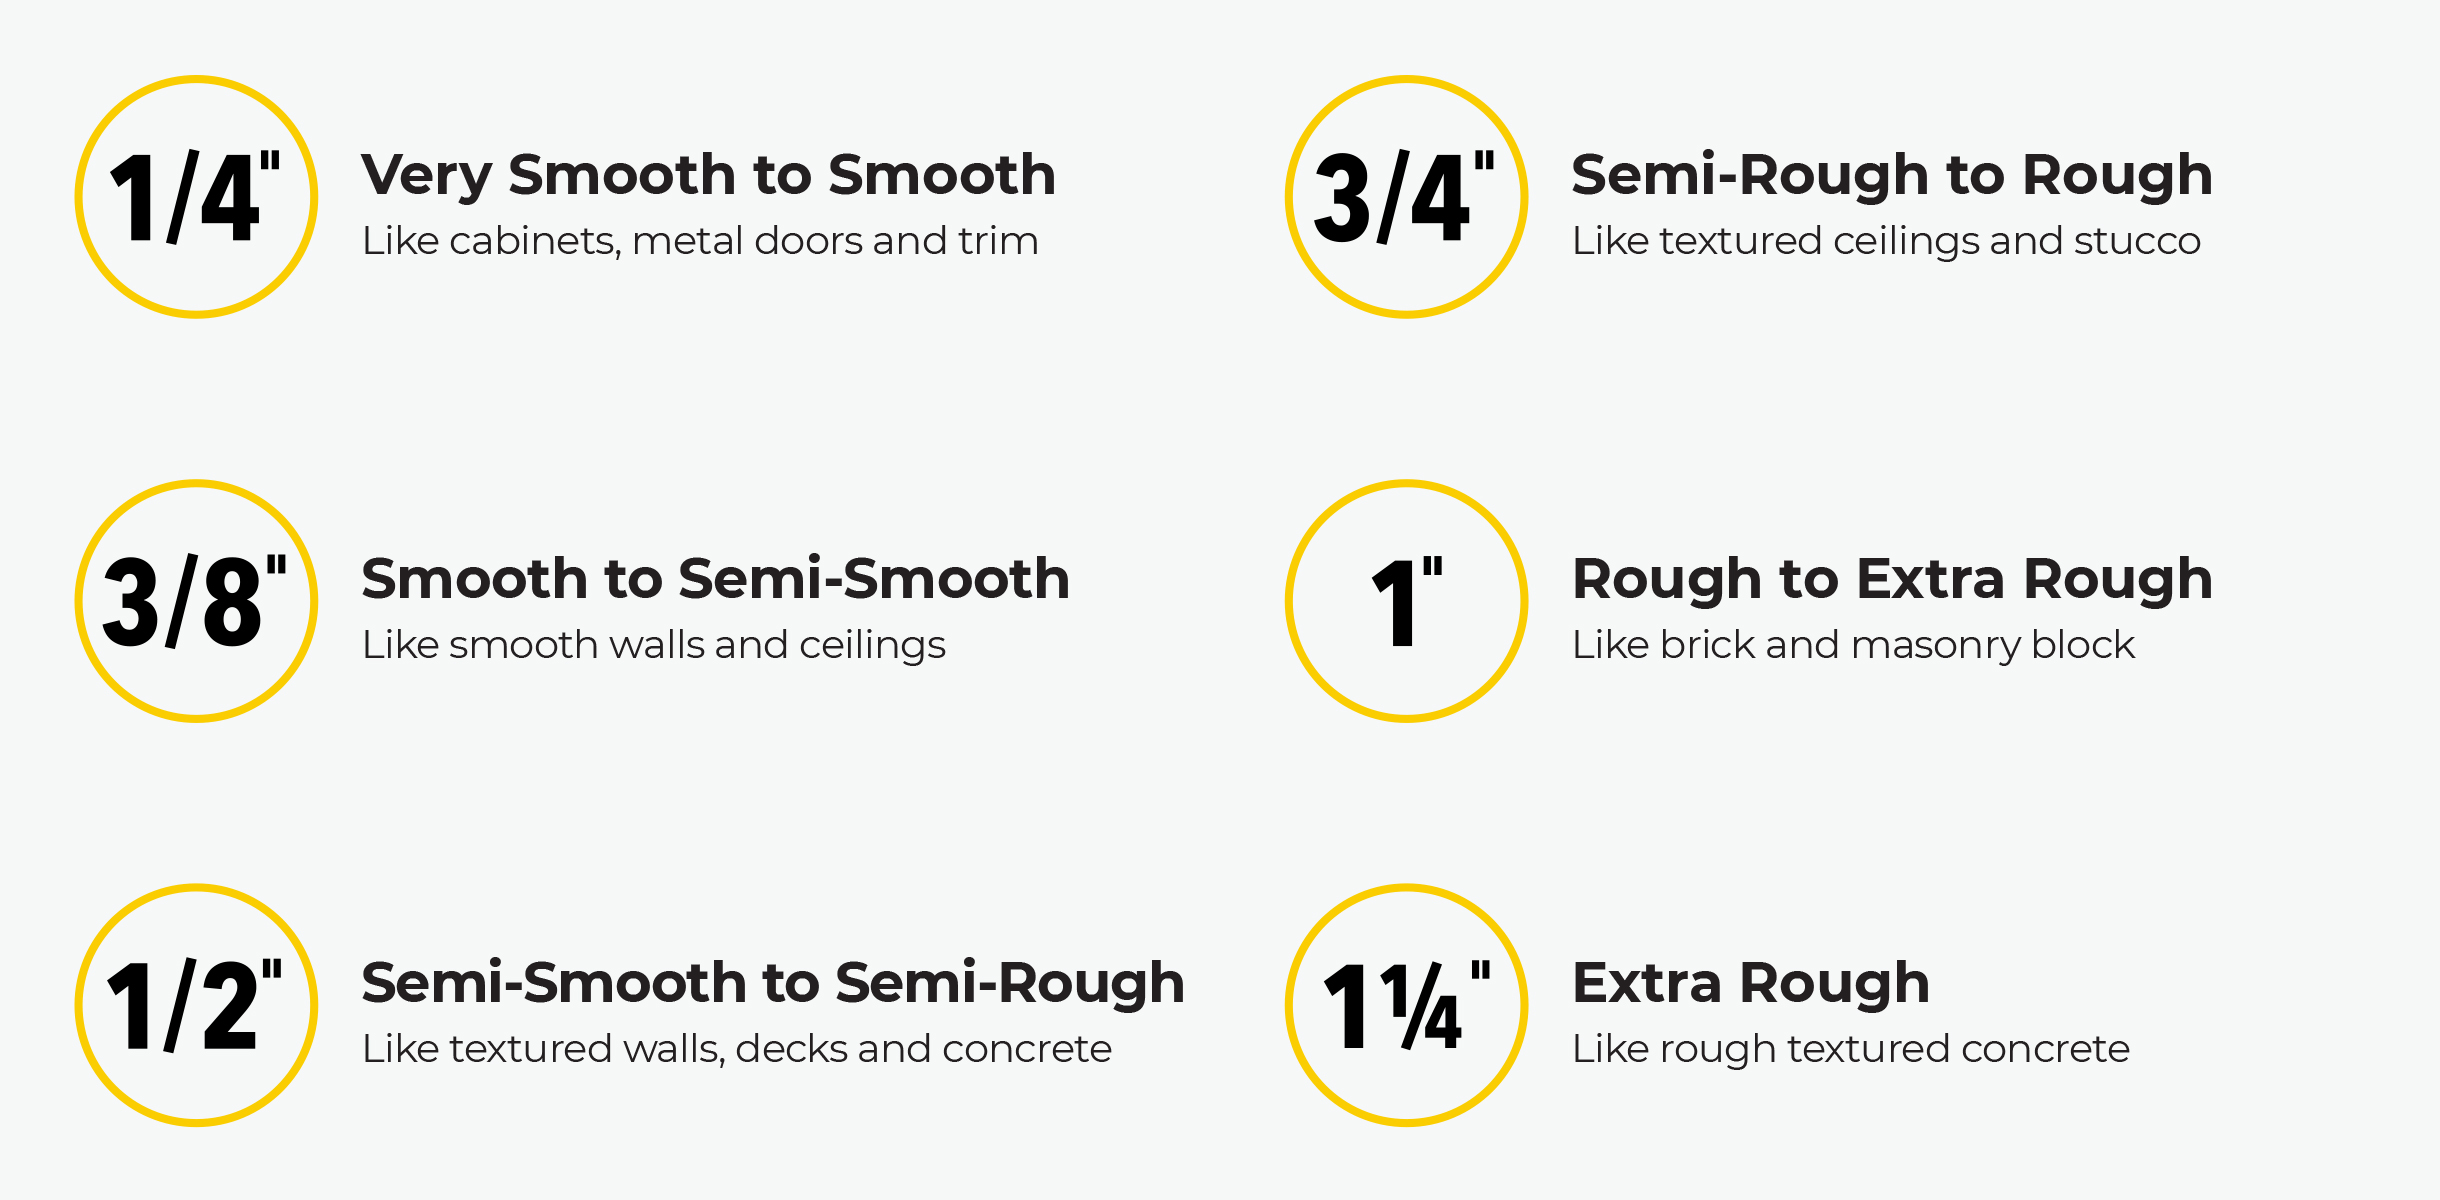
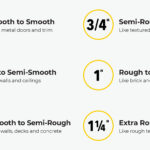
When painting a popcorn (textured) ceiling, you need a roller with a thick nap so it can reach into all the crevices and bumps. A roller with a nap of about 3/4 inch to 1¼ inch is typically recommended for deep, uneven textures like popcorn, while lighter popcorn surfaces can often be covered well with a 3/8 inch to 1/2 inch nap for good paint penetration without excessive buildup. Longer naps hold more paint and help ensure even coverage in the grooves of the texture. Choose a synthetic or slit-foam roller cover designed for textured ceilings to reduce lint and improve paint release into the texture.
Best Nap for Painting Walls– Choosing the Right Roller for Every Wall Type
Use a 3/4–1-1/4 inch nap roller, microfiber or lambswool, for popcorn ceilings.
Choosing the right roller makes or breaks this job. I’ve painted dozens of textured ceilings, and I’ll show you exactly what nap roller to use on popcorn ceiling, why it matters, and how to get a clean, even finish without pulling the texture down. Stick with me, and you’ll paint faster, with fewer drips, and better coverage that lasts.
The best paint roller delivers smooth, even coverage with minimal splatter.
What nap roller to use on popcorn ceiling: sizes and materials that actually work
If you’re asking what nap roller to use on popcorn ceiling, here’s the short path. Use a thick nap that carries enough paint to reach into the texture without crushing it. For most homes, a 3/4 inch nap roller is the sweet spot. If your popcorn is deep or very rough, step up to 1 inch or even 1-1/4 inch.
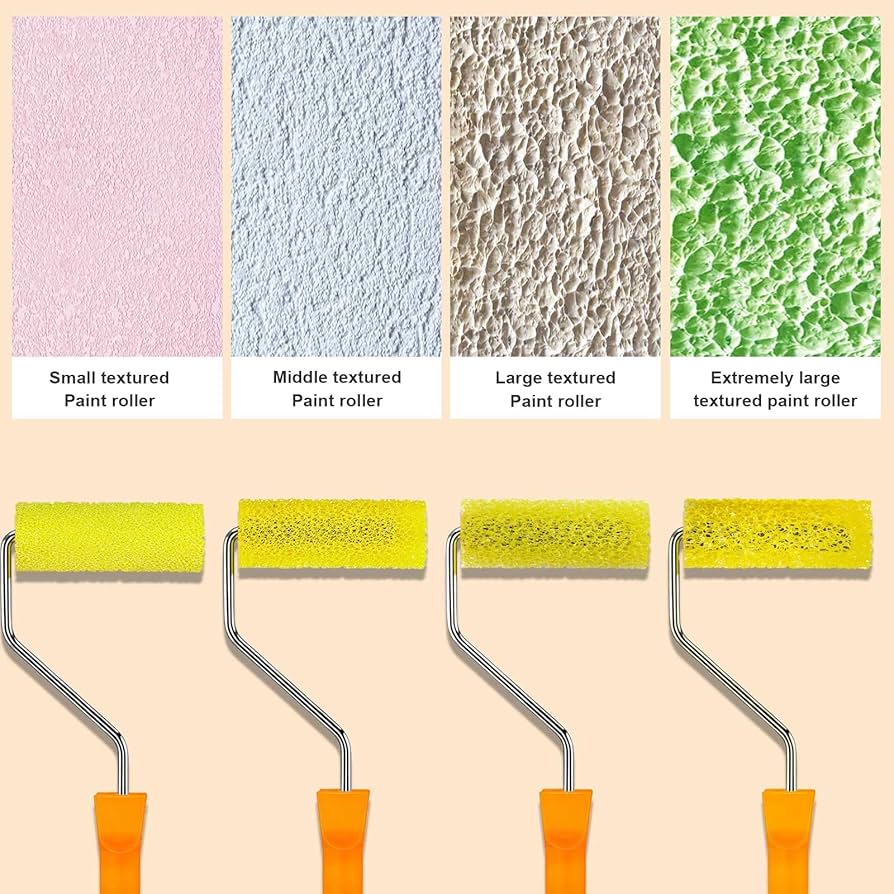
Material matters too. Microfiber and lambswool both work well. Microfiber gives smooth laydown, less spatter, and great coverage. Lambswool holds more paint and works fast, but it can shed if you buy cheap sleeves. Avoid foam rollers; they skip over texture and cause streaks.
Use flat or matte ceiling paint. It hides flaws and reduces glare on the texture. If you’re covering stains or smoke, spot-prime first with a stain-blocking primer. That stops bleed-through and keeps you from overworking the surface.
If you still wonder what nap roller to use on popcorn ceiling in a tricky room, choose by texture depth and condition. A stable, light texture does best with 3/4 inch microfiber. A heavy, bumpy texture or older ceilings that drink paint do better with 1 inch or 1-1/4 inch lambswool or high-capacity microfiber.
Quick picks:
- Light to medium texture: 3/4 inch microfiber
- Heavy texture: 1 inch microfiber or lambswool
- Very dry or porous texture: 1-1/4 inch lambswool or high-capacity microfiber
- Stain-heavy ceilings: Same naps as above, plus stain-blocking primer
How to choose the right nap roller for your popcorn ceiling
When clients ask me what nap roller to use on popcorn ceiling, I start with a few quick checks. These help you match the nap to the job and avoid damage.
Texture condition test:
- Press blue painter’s tape to the ceiling and peel. If texture falls off, use minimal pressure and consider a sprayer. Do not sand popcorn.
- If the texture is firm, you can roll with a 3/4–1 inch nap.
Age and safety check:
- If the ceiling was installed before the 1980s, avoid scraping or disturbing it. Some old popcorn ceilings may contain asbestos. Keep rolling light and even, and avoid sanding.
Room and paint choice:
- Kitchens and baths often need stain-blocking primer and moisture-resistant ceiling paint.
- Large rooms benefit from high-capacity microfiber sleeves to keep a wet edge.
Climate and technique:
- In dry climates, paint skins fast. Load the roller well and work in smaller sections.
- In humid rooms, allow more dry time and avoid heavy coats that sag.
What nap roller to use on popcorn ceiling still on your mind? Match nap depth to texture depth. The thicker the texture, the thicker the nap.

Tools, materials, and prep checklist
You can do a neat job if you prep well. Here is the simple list I use on every popcorn ceiling project.
- Thick nap roller sleeves: 3/4–1-1/4 inch, microfiber or lambswool
- Quality roller frame and sturdy extension pole
- Angled brush for cutting edges
- Ceiling paint, flat or matte; stain-blocking primer if needed
- Plastic sheeting, drop cloths, painter’s tape
- Safety glasses, hat, and a dust mask
- Light sanding sponge only for trim, never for popcorn
- Vacuum with brush attachment for gentle dust removal
- Step ladder and a paint tray with a grid
Tip from the field: De-lint new sleeves with painter’s tape or a damp cloth. Pre-dampen the roller with water (for latex) and spin it out. This boosts paint pickup and reduces shedding.
/how-to-paint-a-popcorn-ceiling-5195080-hero-7ebd4009eaef40b9a057f4a358453dc7.jpg)
Step-by-step: how to paint a popcorn ceiling with a roller
This method keeps the texture intact and gives even coverage. It also answers what nap roller to use on popcorn ceiling in action.
- Protect and prep
- Cover floors and furniture. Tape off the walls if you are messy or new to this.
- Vacuum the ceiling gently to remove dust. Do not scrub.
- Prime stains and test nap
- Spot-prime any stains. If there’s heavy discoloration, prime the whole ceiling.
- Start with a 3/4 inch microfiber roller. If it does not reach the valleys, move up to 1 inch.
- Cut in the edges
- Use an angled brush and a light touch. Don’t drag the brush hard on the texture.
- Load and roll
- Load the roller fully and roll off the excess on the tray grid.
- Roll in straight passes, one direction first. Then back-roll at 90 degrees to fill gaps.
- Keep pressure light. Let the nap do the work.
- Keep a wet edge
- Work in sections of about 4×4 feet. Overlap edges before they dry.
- Second coat
- Let it dry as directed. Then apply a second coat the same way for a uniform look.
If you are still debating what nap roller to use on popcorn ceiling during the job, watch coverage. If you see white peaks and dark valleys, you need a thicker nap or more paint in the sleeve.
Common mistakes and how to avoid them
I’ve seen these errors many times. They waste paint and damage texture.
- Pressing too hard: Heavy pressure crushes popcorn and causes shedding. Use a thicker nap instead.
- Using a thin nap: 3/8 or 1/2 inch naps skip over texture. Use 3/4–1-1/4 inch naps.
- Overloading the roller: Big globs lead to drips and sag. Load well, but roll off excess on the grid.
- Skipping primer on stains: Nicotine or water marks bleed through. Spot-prime first.
- Working too fast or slow: Too fast causes misses. Too slow creates lap marks. Keep a steady pace.
- Ignoring what nap roller to use on popcorn ceiling: The wrong nap means extra coats or damaged texture.

Alternatives: when a sprayer is better than a roller
Sometimes a sprayer is the right tool. Fragile, loose, or extra-deep popcorn can shed under a roller. If your tape test pulls off texture, consider spraying.
Spraying basics:
- Use an airless sprayer with a 0.017–0.019 tip for ceiling paints.
- Set moderate pressure and hold the gun 12 inches from the surface.
- Spray one pass, then light back-roll with a 3/4 inch nap only if the texture is stable.
Sprayers save time in big rooms. They also reduce pressure on the texture. But they add setup, masking, and cleanup time. For many DIY jobs, rolling with the right nap is still simpler.
If you are stuck on what nap roller to use on popcorn ceiling versus a sprayer, choose based on texture stability. Stable texture? Roll. Fragile texture? Spray with care.
Cost, coverage, and time estimates
Plan your budget and schedule with real numbers. Textured ceilings always need more paint than flat walls.
Coverage:
- Expect 150–250 square feet per gallon on popcorn. Smooth walls often do 300–400.
- Thicker naps lay down more paint per pass, which helps coverage in the valleys.
Costs:
- Microfiber or lambswool sleeves: 8–20 dollars each. You may need two for a large job.
- Ceiling paint: 20–60 dollars per gallon, more for premium or stain-blocking.
- Primer: 15–40 dollars per gallon for stain-blocking options.
Time:
- A typical 12×15 room takes 3–5 hours to mask, cut, and roll one coat.
- Add dry time and a second coat for a full day’s project.
Still weighing what nap roller to use on popcorn ceiling from a cost angle? A thicker nap may cost a bit more, but it often saves a second trip around the room.
:max_bytes(150000):strip_icc()/how-to-paint-a-popcorn-ceiling-5195080-hero-7ebd4009eaef40b9a057f4a358453dc7.jpg)
Frequently Asked Questions of what nap roller to use on popcorn ceiling
What nap roller to use on popcorn ceiling for a light texture?
Use a 3/4 inch microfiber roller. It reaches into the texture without leaving heavy orange peel or drips.
What nap roller to use on popcorn ceiling if the texture is very deep?
Use a 1 inch or 1-1/4 inch high-capacity microfiber or lambswool sleeve. Keep pressure light to avoid crushing the peaks.
Can I use a 1/2 inch nap on popcorn ceilings?
It’s usually too thin. You will miss the valleys and need extra coats, which risks overworking the texture.
Is microfiber better than lambswool on popcorn?
Microfiber sheds less and lays paint smoothly. Lambswool carries more paint and works faster, but buy quality to avoid lint.
Do I need a primer before painting a popcorn ceiling?
Prime stains and smoke areas. For clean ceilings, two coats of good flat ceiling paint usually cover well.
Will a thick nap roller make more mess?
A thick nap can spatter more if you roll fast or overload it. Roll at a steady pace and use a tray grid to control paint.
Can I use a sprayer instead of a roller on popcorn?
Yes, for fragile or very rough texture, spraying is safe and fast. Mask well, spray in even passes, and back-roll only if the texture is stable.
Conclusion
The right roller nap makes painting a popcorn ceiling simple. Choose 3/4 inch for most rooms, and move to 1–1-1/4 inch for heavy texture. Use microfiber or lambswool, keep pressure light, and let the nap do the work. That is the clearest answer to what nap roller to use on popcorn ceiling, and it will save you time, paint, and stress.
Ready to get started? Grab the right sleeve, test a small area, and paint with confidence. Want more pro tips like this? Subscribe for updates or drop your questions in the comments so I can help with your next project.
Related posts:
 Best Neutral White Interior Paint– Pro Painter Recommendations
 What Is a Roller Nap? – Choosing the Perfect Roller for Walls and Ceilingswhat is a roller nap?
 Which Zinsser Primer to Use on Varnished Wood (2026) – Pro Tips for Smooth, Long‑Lasting Paint
 A Guide To Roller Nap Lengths– Smooth, Medium, or Thick? Explained