
Cleaning water marks on painted walls usually takes a gentle wash with warm water and mild dish soap, followed by thorough drying. The method for how to clean water marks on painted walls depends entirely on whether the stain is surface dirt or active moisture damage.
Your paint finish and the mark’s source decide which cleaner is safe. Flat paints need less liquid than satin finishes, and old leaks require repair before any washing begins to prevent mold growth underneath.
Who needs to clean water marks on painted walls
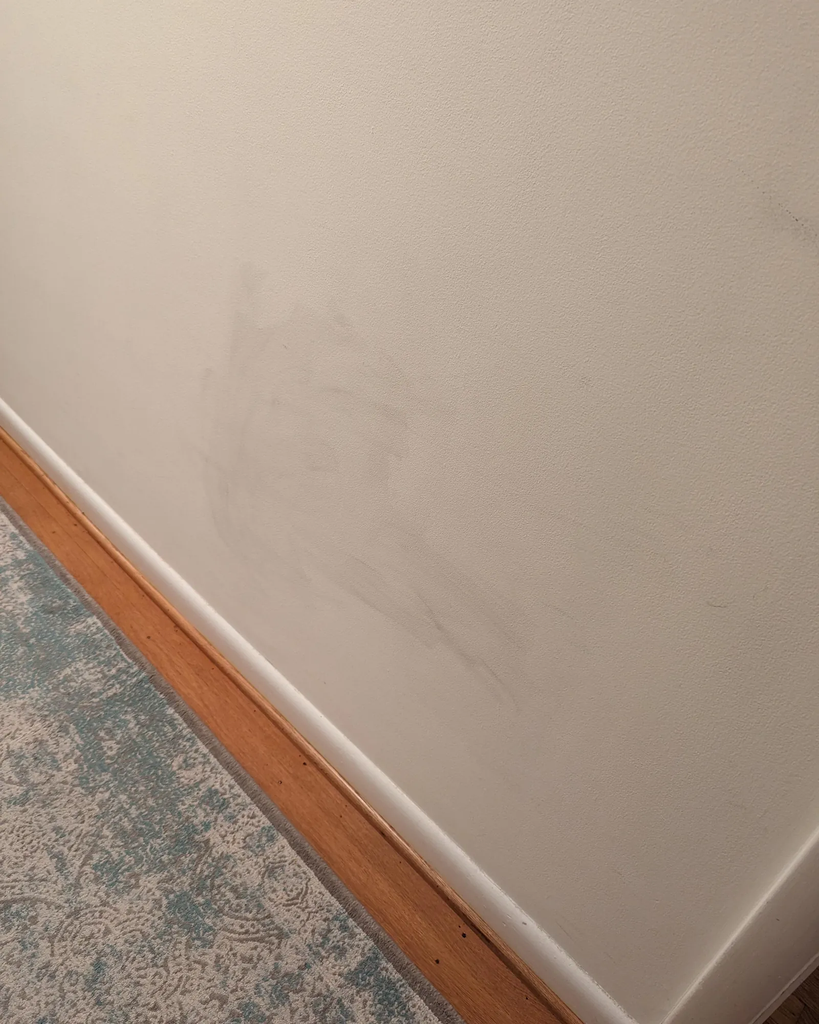
Homeowners noticing brown rings or streaks after a spill or minor leak are the primary readers here. You likely have latex paint in good condition and want to remove cosmetic staining without repainting the entire room immediately.
Renters trying to recover a security deposit also fit this profile well. You need a low-risk method that won’t strip paint or leave shiny spots that landlords flag as damage during final inspections.
This page isn’t for those with bubbling paint, soft drywall, or black fuzzy growth. Those signs mean structural moisture problems requiring professional remediation first. If your wall feels damp to the touch right now, stop reading and find the water source instead.
Factors affecting stain removal success
Paint sheen determines how much scrubbing your wall can handle before showing damage. Flat and matte finishes absorb cleaners easily and burnish if rubbed too hard, while satin and semi-gloss surfaces tolerate more friction and moisture without changing appearance permanently.
The stain’s origin dictates whether cleaning will work at all. Mineral deposits from evaporated tap water respond to vinegar solutions, but tannin stains from wood framing or rusting nails often bleed through regardless of surface cleaning effort.
Time elapsed since the mark appeared changes your approach significantly. Fresh marks lift with plain water, but set-in stains from weeks ago may need specialized cleaners or primer sealing because pigments have bonded with the paint film over time.
Underlying moisture must be completely resolved before attempting any cleaning. Washing a wall that’s still receiving water merely spreads contamination and accelerates deterioration, so verify the source is fixed by checking for dampness with a moisture meter or waiting two weeks after repairs.
7 Best Stain Block Paint for Water Stains (Top-Rated Reviews)
Steps to safely wash painted walls
- Confirm the wall is bone-dry using a moisture meter reading below 15% or by waiting fourteen days post-repair.
- Dust the area gently with a microfiber cloth to prevent grinding particles into wet paint during washing.
- Mix one teaspoon clear dish soap into two cups warm distilled water in a spray bottle.
- Test your solution on a hidden corner and wait ten minutes to check for color transfer or sheen change.
- Mist the stained area lightly until damp but not dripping, working from bottom upward to prevent streaking.
- Wipe gently with a white microfiber cloth using circular motions, rinsing the cloth frequently in clean water.
- Blot excess moisture immediately with a dry towel rather than rubbing, which creates uneven sheen patches.
- Allow the spot to air-dry completely for four hours before assessing whether a second application is necessary.
- Apply a stain-blocking primer only if the mark remains visible after two cleaning attempts and full drying.
Knowing when to stop scrubbing separates successful restoration from costly repainting jobs. If the paint starts feeling gummy, transferring color onto your cloth, or developing a shiny spot compared to surrounding areas, you’ve reached its limit and further agitation causes permanent texture damage.
Different stain types and treatments
Each mark requires a specific approach based on what caused it. Using the wrong treatment wastes time and risks damaging paint that might otherwise survive proper cleaning methods.
| Stain type | Cleaning solution | Effort required | Warning sign |
|---|---|---|---|
| Fresh water splash | Plain distilled water | Low | None typically |
| Hard mineral deposit | White vinegar solution | Medium | Etching on gloss |
| Smoke residue | Degreaser detergent | Medium | Yellow smearing |
| Mold surface spot | Diluted hydrogen peroxide | Medium | Black dots returning |
| Old dried ring | Mild soap mixture | Medium | Paint softening |
| Rust nail streak | Commercial rust remover | High | Orange bleeding through |
Techniques that protect paint finishes
Testing prevents permanent damage
Always perform a spot test in an inconspicuous area before treating visible stains. Wait ten full minutes after testing to observe delayed reactions like whitening, softening, or sheen changes that don’t appear immediately but ruin large sections once discovered mid-cleaning.
Use white cloths exclusively to monitor color transfer during testing and cleaning. A colored rag hides paint loss until it’s too late, while white fabric shows exactly when pigment begins lifting so you can adjust pressure or switch products before causing noticeable damage.
Gentle motion preserves texture
Work in small circles rather than back-and-forth strokes to avoid creating directional wear patterns.
Blotting removes moisture without friction damage that wiping causes. Press dry towels against wet areas and lift straight up, repeating with fresh sections rather than dragging saturated fabric across paint that’s temporarily softened and vulnerable to abrasion.
Common problems and solutions
Problems arise when assumptions about paint durability prove wrong during cleaning. Recognizing these issues early prevents minor mistakes from becoming expensive repairs requiring professional intervention.
| What you notice | What it usually means | What to do first | Prevention next time |
|---|---|---|---|
| Shiny patch appears | Burnished flat paint | Stop scrubbing immediately | Use lighter pressure |
| Color transfers to cloth | Paint dissolving | Switch to plain water | Test cleaner strength |
| Stain returns after drying | Active moisture source | Find and fix leak | Verify dryness first |
| White chalky residue | Mineral deposit left behind | Rinse with distilled water | Use distilled water |
| Dark spots reappear weekly | Hidden mold colony | Consult mold specialist | Address humidity source |
| Paint feels gummy | Latex breaking down | Cease all wet cleaning | Repaint affected area |
| Brown ring expands outward | Tannin bleeding through | Apply stain-blocking primer | Seal before painting |
Safety and ventilation standards
Proper ventilation is essential when cleaning enclosed spaces with any liquid solution.
Wear nitrile gloves to protect skin from prolonged contact with cleaning solutions. Even mild detergents cause dermatitis with repeated exposure, and compromised skin barriers increase absorption rates for whatever chemicals you’re handling during extended cleaning sessions.
Never mix cleaning products unless manufacturer instructions explicitly permit combinations. Bleach and ammonia create toxic chloramine gas, while vinegar and hydrogen peroxide form corrosive peracetic acid that damages both lungs and painted surfaces upon contact.
Electrical safety matters near outlets and switches. Keep liquids away from electrical fixtures and turn off power to nearby outlets if splashing is possible, since water conducts electricity and creates shock hazards that aren’t worth risking for stain removal.
Time and money investment
Basic supplies are inexpensive relative to specialized cleaners assuming you already own microfiber cloths and buckets. Distilled water, clear dish soap, and white vinegar are affordable staples, while specialized cleaners like oxalic acid cost significantly more depending on brand concentration.
Time commitment ranges from thirty minutes for fresh marks to several hours for stubborn stains requiring multiple applications and drying cycles between attempts. Rushing the drying phase between treatments causes most failures, so budget realistic waiting periods into your schedule.
Professional cleaning services are expensive relative to basic supplies for stain treatment. This becomes worthwhile when walls are high, stains cover large areas, or previous DIY attempts have created sheen inconsistencies that require expert correction to restore uniform appearance.
Repainting costs three to five times more than cleaning supplies but becomes necessary when paint is damaged beyond recovery. Factor this potential expense into your decision about how aggressively to treat stubborn marks versus accepting some residual discoloration.
Maintaining results after cleaning
Monitor cleaned areas weekly for the first month to catch recurring problems early. Stains that return indicate unresolved moisture sources or inadequate sealing that requires different intervention before they spread or worsen over time.
Control indoor humidity between thirty and fifty percent to prevent future water marking. Dehumidifiers, exhaust fans, and proper insulation address root causes rather than symptoms, making maintenance cleaning unnecessary except for accidental spills.
Document your cleaning method and products used for future reference.
Touch up paint sheen mismatches with original paint stored properly. Keeping leftover paint labeled with room location and date ensures color matching remains accurate for spot repairs that maintain uniform wall appearance over years.
When cleaning won’t fix walls
Active leaks make cleaning pointless and potentially harmful. Water entering walls carries contaminants deeper into materials each time you add moisture, spreading damage beyond the visible stain and creating conditions favorable to mold growth inside wall cavities.
Soft or crumbling drywall indicates structural compromise requiring replacement. No amount of surface cleaning restores integrity to gypsum board that has lost cohesion, and attempting to wash deteriorating material accelerates collapse while exposing you to embedded contaminants.
Black or green fuzzy growth signals established mold colonies needing professional remediation. Surface cleaning removes only visible spores while leaving root structures intact within porous materials, guaranteeing rapid regrowth and continued health risks for occupants.
Historic plaster walls with lime-based paints require specialist conservation approaches. Modern cleaning methods dissolve traditional binders and cause irreversible damage to heritage surfaces that demand preservation expertise rather than household maintenance techniques.
Frequently asked questions
Can I use bleach on painted walls?
No, bleach damages latex paint binders and causes yellowing on most interior finishes. Hydrogen peroxide diluted to three percent provides safer disinfection without degrading paint films or creating toxic fumes in enclosed spaces.
Why does my stain keep coming back?
Recurring stains indicate unresolved moisture sources behind the wall surface. Cleaning treats symptoms only; finding and fixing the leak, condensation issue, or capillary action causing water intrusion is necessary before any treatment stays effective long-term.
How long should I wait after fixing a leak?
Wait minimum fourteen days after confirmed leak repair before attempting cleaning. Drywall and paint need complete moisture evaporation to prevent trapping water that causes mold growth or adhesive failure beneath newly cleaned surfaces.
Is it safe to clean mold myself?
Surface mold covering less than ten square feet can be cleaned safely following EPA guidelines with proper protection. Larger infestations, HVAC system contamination, or mold returning after cleaning require professional assessment and remediation equipment.
Does distilled water really matter?
Yes, minerals in tap water leave new deposits as existing stains disappear. Distilled water contains no dissolved solids that could replace one problem with another, making it essential for final rinses and mixing cleaning solutions.
What happens if I scrub too hard?
Excessive pressure burnsishes flat paint and removes pigment from all finishes. This creates permanent sheen variations and texture differences that can’t be reversed without repainting the entire wall section to restore uniform appearance.
Can I prevent water marks permanently?
Complete prevention requires eliminating all moisture sources, which isn’t always achievable. Proper ventilation, humidity control, and prompt spill cleanup minimize occurrence, but plumbing failures and weather events create conditions no maintenance routine fully prevents.
Start restoring your walls today
Begin with the mildest solution and smallest test area to establish your paint’s tolerance threshold safely. Expect gradual improvement over multiple gentle applications rather than instant results, watching for sheen changes that signal when to stop.
If paint softens, colors transfer consistently, or stains return despite verified dryness, consult a painting contractor or water damage specialist before continuing.
Related posts:
 How To Get Rid of White Chalky Marks on Painted Walls?– Causes & Solutions
 How To Clean Matte Emulsion Painted Walls?– Safe Methods Every Homeowner Should Know
 Can You Paint Over Painted Wood– Best Practices Painters Use
 How to get a smooth paint finish on wood with a roller?– No Brush Marks Guaranteed