Testing emulsion paint for compatibility is crucial. It ensures a smooth and lasting finish.
Before you start painting, you need to know if the emulsion paint works well with your surface. This can save you time and effort. Imagine painting a wall only to see the paint peel off after a few days. Frustrating, right?
By testing the compatibility first, you can avoid such headaches. It helps you understand how the paint interacts with your surface. Whether it’s wood, metal, or plaster, every surface behaves differently. This simple step can make a big difference in your painting project. Ready to learn how to do it right? Let’s dive in.
“When choosing a finish, many people opt for emulsion paint because of its versatility.”
Choosing The Right Paint
Choosing the right paint can be challenging. Testing emulsion paint for compatibility with your surface is important. This ensures a smooth finish and long-lasting durability. Let’s explore the different types of emulsion paint and how to check if they match your surface.
Types Of Emulsion Paint
Emulsion paint comes in various types. Each type has unique characteristics and uses. Here are some common types:
- Vinyl Matt Emulsion: Gives a non-reflective finish. Ideal for walls and ceilings.
- Vinyl Silk Emulsion: Offers a shiny, satin-like finish. Good for high-traffic areas.
- Vinyl Soft Sheen Emulsion: Provides a subtle shine. Best for living rooms and hallways.
- Kitchen and Bathroom Emulsion: Resistant to moisture and mildew. Perfect for kitchens and bathrooms.
Each type has specific properties. Choosing the right one depends on your needs. For instance, vinyl matt emulsion is good for hiding imperfections. On the other hand, vinyl silk emulsion is easier to clean. Understanding these differences helps you make an informed choice.
Surface Compatibility
Testing paint compatibility is crucial. Not all paints work well on every surface. Here are some steps to test compatibility:
- Prepare the Surface: Clean the area thoroughly. Remove dirt, grease, and old paint.
- Apply a Small Patch: Paint a small section of the surface. Let it dry completely.
- Observe the Results: Check for any issues. Look for peeling, cracking, or bubbling.
- Perform Adhesion Test: Use masking tape. Press it on the painted area and pull it off. If the paint stays intact, it is compatible.
If you see problems like peeling, consider a different type of paint. Sometimes, using a primer can help. It improves paint adhesion. Always test before painting the entire surface. This saves time and effort.
Preparing The Surface
Cleaning The Area
A clean surface is essential for paint adherence. Dirt, dust, and grease can prevent paint from sticking. Follow these steps to clean the area effectively:
- Remove loose debris: Use a broom or brush to sweep away dust.
- Wash the surface: Mix water with mild detergent. Scrub the area with a sponge.
- Rinse thoroughly: Use clean water to remove soap residue. Let it dry completely.
For tougher stains, a stronger cleaning solution may be needed. A mix of water and vinegar can work well. Apply it with a cloth and scrub gently. Always test a small area first. This ensures no damage to the surface.
Proper cleaning not only helps paint stick. It also ensures a smooth and even finish. Take your time to clean thoroughly. The results will be worth the effort.
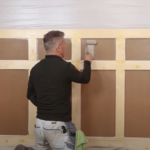
Repairing Imperfections
Surface imperfections can affect paint adhesion. Cracks, holes, and dents need attention. Here’s how to repair them:
- Identify imperfections: Inspect the surface closely. Mark areas that need repair.
- Fill cracks and holes: Use a suitable filler. Apply it with a putty knife. Smooth it out and let it dry.
- Sand the area: Once dry, sand the filled spots. This ensures a smooth surface.
For larger repairs, you may need additional tools. A patch kit can be useful for big holes. Follow the instructions on the kit for best results.
Properly repairing imperfections is key. It ensures the paint adheres well and looks good. Taking time to fix these issues will improve the final outcome. A smooth surface makes all the difference.
Testing Methods
There are several methods to test emulsion paint. This guide will help you with two popular methods: the patch test and the adhesion test.
Patch Test
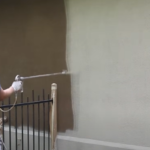
The patch test is simple yet effective. It helps you see how the paint looks and behaves on your surface. Follow these steps:
- Choose a small, hidden area on your wall.
- Clean the area to remove dirt and grease.
- Apply a thin coat of emulsion paint.
- Let it dry for 24 hours.
Check the test patch for these signs:
- Color: Make sure the paint color is what you expected.
- Texture: Look for any uneven or rough spots.
- Adhesion: Ensure the paint sticks well without peeling.
A successful patch test means the paint is likely compatible. If there are issues, you might need a different paint or primer.
Adhesion Test
The adhesion test checks if the paint will stay on the surface. This is crucial for long-lasting results. Follow these steps:
- Choose a small, hidden area on your wall.
- Clean the area to remove dirt and grease.
- Apply a thin coat of emulsion paint.
- Let it dry for 24 hours.
After the paint dries, perform the adhesion test:
- Cut small X: Use a sharp knife to cut a small X in the paint.
- Apply tape: Place a piece of strong tape over the X.
- Remove tape: Pull the tape off quickly.
Check the test area for these signs:
- Peeling: If the paint comes off with the tape, it may not adhere well.
- Cracking: Look for any cracks around the cut area.
- Firmness: Ensure the paint feels firm and solid.
If the paint passes the adhesion test, it is likely to last long. If not, consider using a primer or a different paint.
Evaluating Results
By following these steps, you can avoid common pitfalls and achieve a beautiful finish.
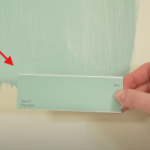
Visual Inspection
Visual inspection is the first step in testing emulsion paint. Start by applying a small amount of paint to a hidden area. This will help you see how the paint looks on the surface. Let it dry for the recommended time.
Key aspects to check during visual inspection include:
- Color Match: Ensure the paint color matches your expectations.
- Consistency: Look for a smooth and even finish without streaks.
- Coverage: Check if the paint covers the surface well with one coat.
- Texture: Make sure the paint does not create an unwanted texture.
If any of these aspects are not satisfactory, the paint might not be suitable. Sometimes, multiple coats are needed to achieve the desired look. Always follow the manufacturer’s instructions for best results. This step helps you understand how the final paint job will appear.
Durability Check
Durability check is essential to ensure the paint lasts long. Start by testing a small painted area. Use a damp cloth to rub the surface gently. Observe if the paint comes off or fades. This test will show the paint’s resistance to moisture.
Next, perform an adhesion test. Use a piece of tape to stick on the painted area. Pull it off quickly and check if any paint comes off. This indicates how well the paint adheres to the surface.
Consider the following points for durability:
- Moisture Resistance: Ensure the paint withstands water exposure.
- Adhesion: Check if the paint sticks well to the surface.
- Scratch Resistance: Test if the paint resists scratches and abrasions.
Performing these tests will help you assess the paint’s durability. If the paint fails any of these tests, it may not be the best choice. Choose a paint that meets all these criteria for a long-lasting finish.
Common Issues
Without proper testing, you might face common issues. These issues can ruin your hard work and the appearance of your walls. Understanding these problems can help you prevent them.
Bubbling
Bubbling is a common problem with emulsion paint. It occurs when air or moisture gets trapped under the paint. This can happen due to various reasons. Some of the main causes include:
- Applying paint on a damp surface
- Painting over dirt or grease
- Using incompatible paint types
To avoid bubbling, ensure the surface is clean and dry. Use a primer if necessary. A primer can help create a smooth base for the paint. Another tip is to apply thin layers of paint. Thick layers can trap air and moisture. Allow each layer to dry completely before adding the next.
Conduct a small test patch. Paint a small area and let it dry. Check for bubbles before proceeding. This simple step can save you time and effort.
Peeling
Peeling is another issue with emulsion paint. This happens when the paint loses adhesion to the surface. The main reasons for peeling include:
- Poor surface preparation
- High humidity levels
- Using old or low-quality paint
Preparing the surface properly is essential. Make sure to remove any loose or flaking paint. Sand the surface to create a smooth finish. This helps the new paint stick better.
Humidity can also affect paint adhesion. Paint in dry conditions whenever possible. If humidity is high, use a dehumidifier. This can help reduce moisture in the air.
Finally, always use fresh, high-quality paint. Old paint may not adhere well and can lead to peeling. Conduct a test patch to check for any peeling issues. This way, you can identify and fix problems early on.
Choosing The Right Finish
Matte Vs. Glossy
Understanding the differences between matte and glossy finishes is important. It helps you make an informed decision.
Matte finishes have a non-reflective surface. They are good at hiding imperfections. Matte finishes are perfect for walls with small dents or cracks.
- Non-reflective
- Hides imperfections
- Ideal for large walls
Glossy finishes are shiny and reflective. They make surfaces look smooth. Glossy finishes are best for areas that need frequent cleaning, like kitchens and bathrooms.
- Shiny and reflective
- Shows imperfections
- Easy to clean
Choosing between matte and glossy depends on your needs. Think about the room’s use and the surface’s condition.
Sheen Level
Sheen level is another factor to consider. It affects the paint’s appearance and durability. Different sheen levels have different uses.
Flat sheen has no shine. It hides surface flaws well. But, it is less durable. Ideal for ceilings and low-traffic areas.
Eggshell sheen has a slight shine. It is more durable than flat. Good for living rooms and bedrooms.
| Sheen Level | Characteristics | Best For |
|---|---|---|
| Flat | No shine, hides flaws | Ceilings, low-traffic areas |
| Eggshell | Slight shine, durable | Living rooms, bedrooms |
| Satin | Soft sheen, more durable | Hallways, kitchens |
| Semi-gloss | Moderate shine, very durable | Bathrooms, trim |
| Gloss | High shine, easy to clean | Doors, cabinets |
Satin sheen has a soft glow. It is more durable than eggshell. Ideal for hallways and kitchens.
Semi-gloss sheen offers more shine and durability. Perfect for bathrooms and trim.
Gloss sheen is the shiniest and easiest to clean. Best for doors and cabinets.
Choose the sheen level based on the room’s function. And how much traffic it gets.
Application Tips
Testing emulsion paint for compatibility with your surface is crucial before starting your painting project. It ensures the paint adheres properly and looks great.
Tools Needed
Before starting, gather all the necessary tools. This will make the process smoother and more efficient. Here is a list of tools you will need:
- Paint brush or roller: For applying the paint evenly on the surface.
- Sample emulsion paint: To test on a small area.
- Masking tape: To mark off the test area.
- Measuring tape: To measure the test area accurately.
- Drop cloth: To protect the floor and surrounding areas.
- Sandpaper: To smooth out the surface if needed.
- Cleaning cloth: To clean the surface before testing.
- Water and detergent: For cleaning the surface and tools.
Having these tools ready will help you perform the test quickly. This preparation step is often overlooked but it’s very important.
Technique
Now, let’s talk about how to test the paint on your surface. Follow these steps for the best results:
- Prepare the surface: Clean the surface with water and detergent. Let it dry completely. If the surface is rough, sand it down with sandpaper.
- Mark the test area: Use masking tape to mark a small test area. A 1-foot square is usually enough.
- Apply the paint: Use a paintbrush or roller to apply a thin layer of the emulsion paint. Let it dry according to the paint instructions.
- Observe the results: Check the test area after the paint has dried. Look for any signs of peeling, cracking, or poor adhesion.
- Evaluate: If the paint adheres well and looks good, it is compatible with your surface. If not, you may need to prepare the surface better or choose a different paint.
Testing the paint might seem like an extra step, but it can save you from a lot of trouble later. It ensures that your painting project goes smoothly and the end result is beautiful and long-lasting.
Conclusion
Testing emulsion paint compatibility is essential. It ensures your paint adheres well. Follow the steps carefully. Check for peeling or blistering. These are signs of incompatibility. Small tests prevent big problems later. Always choose the right paint for your surface.
Your efforts will result in a smooth, long-lasting finish. Proper testing saves time and money. Happy painting!