
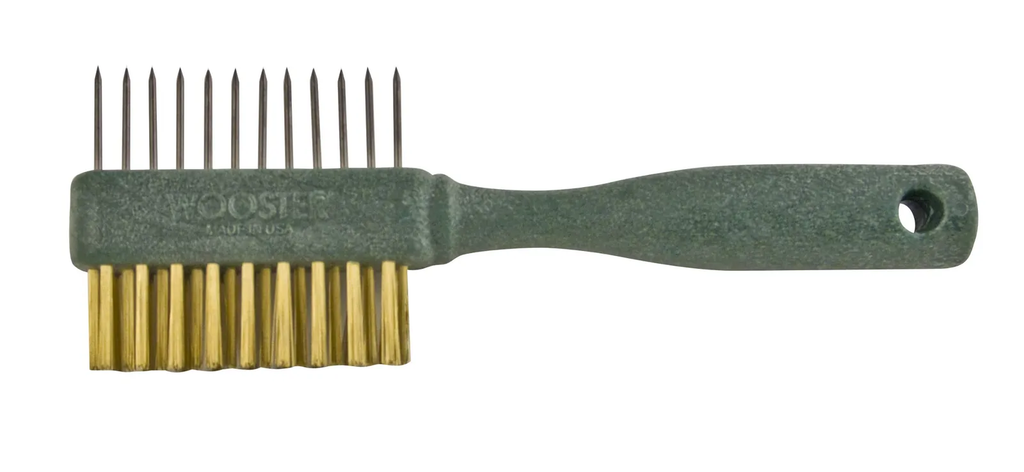
A paint brush comb removes wet paint from the heel and between the bristles of a brush so it doesn’t dry there and ruin the tool. You drag the metal teeth from the ferrule to the tip while the paint is still wet, repeating until the bristles separate cleanly. That’s how to use a paint brush comb on any standard decorating brush.
The exact method changes based on your paint type, your brush size, and whether you’re cleaning or just reshaping during a job. Water-based paint combs out fast; oil-based paint needs solvent first. A 4-inch wall brush takes more passes than a 1-inch trim brush. The rest of this page covers each condition.
Who uses a paint brush comb
Three different people search for this tool, and they don’t need the same thing. A homeowner painting one room has cheap synthetic brushes and water-based latex paint. They need to know if a comb saves an inexpensive brush or just wastes their time. This page serves them best.
A professional painter with natural bristle brushes and alkyd enamel works faster and uses stronger solvents. They already own a comb but want to stop snapping bristles at the ferrule. The steps here apply to them too, though they’ll skip the basics about soaking.
Someone restoring dried, stiff brushes found in a garage is looking for something else entirely. A comb can’t fix paint that cured solid weeks ago. That job needs a dedicated brush restorer or hours in solvent, not a combing guide. If your brush is hard as a stick, put it down and read a guide on reviving ruined brushes instead.
This page assumes your brush is wet or damp with paint right now. It also assumes you have a standard flat or angled sash brush between 1 and 4 inches wide. If you’re working with a round stippling brush or a specialty faux-finish tool, the teeth spacing on a standard comb won’t match the bristle layout. Check your brush maker’s care instructions before dragging metal through unusual shapes.
We Tested Best Paint Brush Comb: 10 Picks That Clean Without Bending
What changes the result
Four things decide whether a comb leaves your brush clean or tears it apart. Getting any of them wrong costs you bristles.
The state of the paint matters most. Wet paint moves easily through the gaps. Paint that has started to skin over grabs the teeth and pulls bristles out by the root. If the surface feels tacky, dip the brush back in solvent or water before touching it with the comb. Never force metal through drying paint.
Bristle material is the second factor. Synthetic filaments like nylon or polyester bend and bounce back when combed. Natural hog bristle splits at the tip and snaps near the base if you push too hard. Use lighter pressure on natural hair, and stroke only in one direction—away from the metal band holding the bristles.
Brush width changes how many strokes you need. A 1-inch trim brush clears in three or four passes. A 4-inch wall brush holds much more paint deep in the heel, requiring ten or more careful strokes to reach the bottom. Work in sections across a wide brush rather than trying to span it all at once.
Tooth spacing on the comb itself must fit the bristle thickness. Fine artist brushes need closely spaced thin wire teeth. House-painting brushes need wider gaps. Using an artist’s comb on a thick wall brush bends the wire; using a coarse comb on fine bristles skips the paint hiding between them. Match the tool to the brush width printed on the handle.
People get the paint state wrong most often. They wait until the end of the day to comb out a brush that sat in the sun for two hours. By then, the heel is already setting up. Comb immediately after your last stroke, or keep the brush wrapped in a damp cloth until you do.
How to comb a paint brush
You need the brush, the comb, and the right liquid for your paint type. Water for latex, mineral spirits for oil-based. Do this at a sink or over a waste bucket, never over finished floors.
- Wipe the brush against the rim of the paint can to remove the heaviest load. Squeeze gently from the ferrule toward the tip. The brush shouldn’t drip heavily before you start combing.
- Dip the bristles into your cleaning liquid. Swirl for 5 seconds to wet the heel completely. For a 2-inch brush, use about half a cup of liquid in a container.
- Hold the brush in one hand with the bristles pointing away from you. Grip the comb in your other hand so the teeth face the bristles.
- Place the teeth flat against the metal ferrule. Don’t hook them under the metal band. Press just hard enough to feel the teeth slide between the bristles.
- Pull the comb straight down toward the tips in one smooth motion. Don’t twist your wrist. You should see paint push out ahead of the teeth.
- Wipe the comb’s teeth on a rag after every single stroke. Combing dirty teeth back into clean bristles pushes paint deeper into the heel.
- Repeat strokes 4 through 6 until the liquid running off the tips is clear. A 2-inch synthetic brush usually takes 6 to 8 passes.
- Dip and swirl the brush in fresh liquid one last time. Comb through twice more to align the bristles straight.
- Shake the brush sharply downward twice to remove excess liquid. Reshape the tip with your fingers so it forms a straight edge.
The judgement call is pressure. Push until you feel resistance from the bristles bending, then ease off slightly. If you hear a snapping sound, you’re pressing too hard or pulling at an angle. Stop immediately.
A brush that sheds bristles during combing will shed them on your next wall. If the paint won’t move despite correct pressure, the brush needs a longer soak in solvent—don’t fight it with force.
If you’re dealing with lead-based paint in a home built before 1978, the US Environmental Protection Agency requires specific containment and disposal methods for contaminated wash water. Don’t comb these brushes over a regular drain. Check the EPA lead paint guidelines for your local rules before starting.
Situations and what to do
Different jobs change how you handle the comb. Here’s what shifts based on your setup.
| Your situation | What to do | What it takes | Watch for |
|---|---|---|---|
| Fresh latex paint | Comb with plain water | 2 minutes | Bristles staying clumped |
| Oil-based enamel | Soak in mineral spirits first | 10 minutes | Solvent turning dark |
| Dried paint spots | Soak overnight, then comb | 12 hours | Snapping sounds |
| Wide 4-inch brush | Comb in 1-inch sections | 5 minutes | Missing the center heel |
| Fine artist brush | Use small-tooth comb gently | 1 minute | Bent wire teeth |
| Natural hog bristle | Stroke lightly, one way only | 3 minutes | Split bristle tips |
Water-based paint rinses out fast, but it dries fast too. If you step away for ten minutes without wrapping the brush, the heel locks up. Oil-based paint gives you more working time, yet demands proper solvent. Don’t use water on alkyd paint—it won’t dissolve the resin, and you’ll just push it deeper.
For fine artist brushes, standard hardware store combs are too aggressive. Buy a smaller comb made for art supplies. The wire gauge is thinner, and it won’t snap delicate sable or soft synthetic hairs. Always check the tooth gap against your bristle thickness before the first stroke.
Details that protect the bristles
Starting at the ferrule
The heel is where brushes die. Paint pools in the gap between the bristles and the metal band, gluing everything together as it cures. You must place the comb’s teeth directly against the ferrule on your very first stroke.
Starting halfway down the bristles leaves the heel untouched. The top looks clean, but the base stays packed. Within three uses, the brush flares outward and loses its edge because the heel is permanently swollen with old paint.
Press the teeth flat against the metal. Drag downward. If you feel a hard block right at the base, stop. Soak the brush for another five minutes in your cleaning liquid. Forcing the comb through a packed heel snaps bristles at their anchor point.
Keeping the teeth clean
Wiping the comb after every stroke isn’t optional. Paint builds up between the wires quickly. When you drag a loaded comb back into the brush, you’re injecting old paint into spaces you just cleared.
Keep a dry rag folded in your non-dominant hand. Pinch the teeth after each pass and pull the rag down. You should see a stripe of color come off. When the rag wipes clean, the comb is ready for the next stroke.
Don’t rinse the comb in the same dirty solvent you’re washing the brush in. That just coats the wires again. Use a separate jar or wipe it dry. A clean comb cuts through wet paint; a dirty one smears it around.
Brush comb problems and fixes
When something goes wrong, the brush tells you immediately. Match the symptom to the cause below.
| What you notice | What it usually means | What to do first | How to stop it happening again |
|---|---|---|---|
| Bristles snapping off | Too much pressure applied | Ease grip, soak longer | Let solvent work first |
| Comb teeth bending | Wrong comb for brush size | Switch to wider spacing | Match teeth to bristles |
| Paint stays in heel | Skipped the ferrule start | Start teeth at metal band | Always begin at base |
| Bristles stay clumped | Dried paint blocking gaps | Soak overnight in solvent | Comb while paint is wet |
| Ferrule feels loose | Prying under the metal | Stop combing immediately | Never hook teeth underneath |
| Liquid turns black fast | Heavy buildup deep inside | Change solvent, repeat | Wipe brush well first |
If the ferrule wiggles after combing, you hooked the teeth under the metal band and leveraged it upward. That breaks the epoxy holding the handle together. No amount of careful combing fixes a loose ferrule once the glue fails. Wrap the neck with tape as a temporary hold, but plan to replace the brush.
Clumping that won’t break apart means the paint skinned over before you started. Water won’t fix dried acrylic or latex. You need a dedicated brush cleaner formulated for dried paint, not just soap and water. Follow the bottle’s soak time exactly.
Rules for paint waste
Where the dirty liquid goes matters as much as how you clean the brush. Pouring solvent-laced mineral spirits down a household drain violates local hazardous waste laws in most jurisdictions. Water-based latex wash water carries microplastics and chemical additives that municipal treatment plants aren’t designed to filter out.
Check your local municipality’s public works website for paint disposal rules. They publish the exact limits on what can enter the storm drain versus the sanitary sewer. In areas governed by the EPA’s Clean Water Act regulations, discharging paint solids into waterways carries fines.
Let your dirty solvent sit in a sealed glass jar. The paint sludge sinks to the bottom over a few days. Pour the clear liquid off the top to reuse it. Take the remaining sludge to a designated household hazardous waste drop-off site. Never pour it into the soil or a street gutter.
For water-based paints, let the wash water evaporate in a wide bucket outdoors if local rules allow it. Peel the dried residue out and throw it in the regular trash. If your area prohibits open evaporation, collect the wash water in a jug and bring it to the same hazardous waste facility.
Time and effort involved
Combing a brush doesn’t cost money beyond buying the tool once, which is inexpensive relative to replacing brushes. The real cost is the time you spend doing it instead of walking away from a finished job.
A 2-inch synthetic brush loaded with latex paint takes about 2 to 3 minutes to comb clean at the sink. That assumes you wiped it well on the can rim first. If you skip the wiping, you’ll spend closer to 5 minutes pushing heavy loads of paint out.
Oil-based enamel adds time because the solvent needs to penetrate. Expect 8 to 10 minutes per brush, including a mid-way solvent change. Wide 4-inch brushes double these figures because you must work in overlapping sections across the ferrule.
The trade-off is replacement cost. A quality angled sash brush costs significantly more than a comb. Skipping the comb ruins the heel within a handful of uses, forcing you to buy another one. Three minutes of combing protects that investment.
If you’re using disposable dollar-store foam brushes, don’t bother combing. Throw them away. The effort costs more than the brush.
Storing the brush after combing
A combed brush still needs correct storage to hold its shape. Leaving it standing upright on its bristles while damp causes them to curl permanently. Hanging it by the handle hole is the safest option.
Wrap the clean, damp bristles tightly in the original cardboard keeper that came with the brush. If you threw that away, fold heavy paper around the tip and secure it with a rubber band. This forces the bristles to dry flat and straight.
Don’t leave the brush sitting submerged in solvent overnight unless you’re actively stripping dried paint. Continuous soaking swells wooden handles and dissolves the epoxy inside the ferrule. Once the combing is done, the liquid exposure should end.
The sign that your storage failed is a curved tip or a flare at the base when the brush is completely dry. If the bristles curve, you can sometimes reshape them by dipping in hot water and rewrapping tightly, but prevention is easier. Check the bristles before your next painting session. If they feel stiff or stick together, the comb didn’t reach the heel last time.
When to skip the comb
A comb is useless on a brush filled with two-part epoxy or catalyzed polyurethane. These coatings cure through a chemical reaction, not evaporation. Once mixed, they harden regardless of what you do. Throw the brush away when the pot life expires. Trying to comb curing epoxy ruins the tool and risks skin contact with harsh chemicals.
Rollers don’t take combs either. The nap fibers are glued to a tube, and dragging wire teeth through them shreds the fabric instantly. Use a roller spinner or a curved scraper designed specifically for roller sleeves.
If you’re applying wood stain, the brush holds very little product compared to thick house paint. Wiping the bristles on a rag is usually enough. Combing a stain brush often does more damage than the stain itself, especially on cheap natural bristles. Reserve the comb for heavy-bodied paints like primers, enamels, and exterior latex where the heel actually packs solid.
Frequently asked questions
Can I use a regular hair comb instead?
No, plastic hair combs lack the stiffness to push wet paint out of a brush heel. The teeth bend immediately against dense bristles. You need a metal wire comb made for painting tools to generate enough force without snapping.
Why does my brush still feel stiff after combing?
Stiffness means paint dried in the heel before you started combing. The comb moved the wet surface layer but couldn’t reach the hardened base. Soak the brush in the appropriate solvent for several hours, then try again.
How long should I soak the brush before combing?
Soak for 5 minutes in mineral spirits for oil paint, or 2 minutes in warm water for latex. If the brush was left out and started drying, extend the oil soak to 30 minutes. Check by squeezing the heel; it should feel soft.
Is it safe to comb natural bristle brushes?
Yes, but you must use much lighter pressure than on synthetic ones. Natural hog bristle splits and breaks easily. Stroke only downward from the ferrule, never scrub back and forth. Keep the teeth moving smoothly to avoid catching individual hairs.
What happens if I comb a dry brush?
You’ll snap bristles and bend the comb’s wire teeth. Dry paint acts like glue. The metal teeth catch on hardened lumps instead of sliding between filaments. Always wet the brush thoroughly with the correct solvent before the first stroke.
Does it matter which side of the comb I use?
Most painter’s combs have two edges: fine teeth for small brushes and wide teeth for large ones. Match the spacing to your bristle thickness. Using wide teeth on a fine artist brush skips the paint hiding between tight hairs.
How often should I replace the comb itself?
Replace it when the wire teeth show visible bends or gaps. A warped comb pushes bristles sideways instead of separating them straight. With normal weekly use, a steel comb lasts several years. Rinse and dry it after every session to prevent rust.
First steps for your brush
Start by wiping your wet brush heavily on the can rim, then make your first comb stroke directly against the ferrule. You’ll see thick paint push out immediately, leaving separated, flexible bristles behind. If the comb teeth bend backward or you hear snapping, stop and soak the brush longer before trying again.
Related posts:
 We Tested Best Paint Brush Comb: 10 Picks That Clean Without Bending
 5 Best Exterior House Paint Primer: The Secret to Paint That Lasts 15+ Years
 Does Paint Look Lighter Or Darker Than The Sample– Secret Tips for Perfect Color Matching
 5 Best Paint Brush for Cabinets: Tested The Brush That Makes the Difference