
Paint peeling off in sheets happens when moisture or a missing primer breaks the bond between layers, and you’ll usually see it within 1 to 3 years on exterior walls or much faster near leaks. The whole film lifts cleanly because nothing holds it to the surface below.
The exact cause changes based on your wall material, whether the old coat was oil or latex, and where the moisture comes from. Those three things decide if you just scrape and repaint or fix a leak first.
Who needs to fix peeling paint
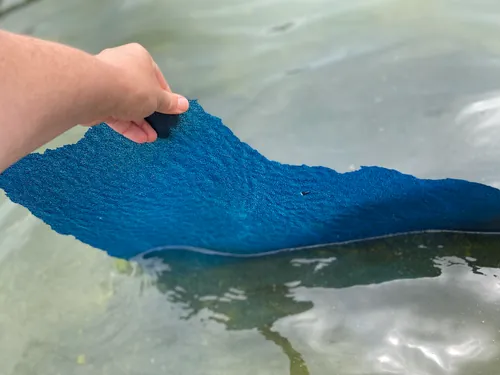
Three different people search for this problem, and they don’t all need the same page. A homeowner with blistering exterior siding needs to know if water is getting behind the boards. A renter seeing large flakes fall from a bathroom ceiling needs to document damage before touching anything. Someone flipping a house wants the fastest way to make a wall look smooth again.
This page serves the homeowner who owns the property and can safely reach the damaged area with a standard ladder. You have basic hand tools and want to stop the spread before repainting. If you’re renting, don’t scrape. Tell your landlord, because altering the property might violate your lease.
If the peeling covers more than one room or sits above a window frame that feels soft, you’re looking at a structural moisture issue. That requires a building inspector, not a scraper. This guide assumes the damage is limited to one wall section under about 20 square feet, the wood or drywall underneath feels solid, and there’s no active plumbing leak feeding it.
You also need to know what’s under that failing layer. If the building went up before 1978, the old coats might contain lead. Don’t sand it yourself. The EPA sets strict rules for disturbing older surfaces, so check their guidance before you start.
7 Best Primer for Peeling Paint (Tested For Lock Down Damaged and Flaking Paint)
What decides if the new coat sticks
Five things control whether your repair lasts or fails exactly like the last one. Getting even two of them wrong guarantees you’ll be scraping again soon.
Moisture is the biggest factor, and it’s the one people misjudge most often. Water pushing out from inside the wall will lift any new product you apply. If the wall feels cool and damp in the morning, or if the damage sits directly below a roofline or above a shower, you have a moisture source to fix first.
Check by taping a 12-inch square of plastic wrap flat against the bare spot. Leave it for 24 hours. Condensation under the plastic means the wall is still wet.
The type of old coating matters next. Putting water-based latex directly over old oil-based work without a bonding primer causes the new layer to shrink and pull away as it dries. Rub a rag soaked in denatured alcohol over the old edge. If the color transfers and the surface softens, it’s latex. If it stays hard and glossy, it’s oil.
Surface preparation dictates the mechanical grip. Paint doesn’t stick to dust, chalk, or gloss. You have to remove everything that moves and scuff everything that stays.
Temperature during application changes how the binder cures. Most standard architectural coatings need the air and the wall surface to stay above 50°F for 48 hours after you finish. Read the specific temperature range printed on your chosen can, because formulations differ.
Finally, primer selection bridges the gap between the bare substrate and the topcoat. Bare wood needs a stain-blocking primer. Bare drywall needs a PVA sealer. Using the wrong one wastes your time.
How to Remove Paint Peeling Off in Sheets
You can’t patch over a bad foundation. Every step here prepares the surface so the new layers actually hold. Wear safety glasses and an N95 mask to keep dust out of your lungs.
- Scrape the loose areas using a rigid carbide scraper. Push it flat against the wall until you hit edges that won’t lift. Stop when the tool only slides over firmly attached material.
- Sand the transition line where the bare wall meets the old layer. Use 80-grit paper to feather that ridge down until you can run your finger across it without feeling a sharp drop.
- Wipe the entire sanded area with a damp sponge. Rinse the sponge frequently. Let the wall dry completely, which takes about 2 hours in a ventilated room.
- Apply a stain-blocking primer to every inch of bare substrate. Use a brush for corners and a roller for flat spaces. Let it dry according to the hours printed on the primer can.
- Run your hand over the primed surface once it’s dry. If you feel ridges or rough spots, sand them lightly with 120-grit paper and wipe the dust away.
- Brush on your first topcoat layer. Keep a wet edge by working in 3-foot sections so you don’t leave lap marks where the strokes overlap.
- Wait the exact number of hours listed on your can before adding the second topcoat. Applying it too early traps solvents and causes bubbling.
The judgement call that separates a lasting repair from a quick cover-up is knowing when to stop scraping. If pulling one loose edge causes the surrounding 2 feet to release, the adhesion failure isn’t local. At that point, stripping the entire wall becomes necessary. If the damage involves crumbling drywall paper or rotted wood fibers beneath the old layers, you’ve crossed into carpentry. Call a contractor to replace the substrate before anyone applies new coatings.
Different causes and their fixes
Every peeling wall looks similar, but the reason it failed changes how you handle it. Here are the situations you’ll actually face.
| What caused it | What to do | Effort needed | Watch out for |
|---|---|---|---|
| Interior humidity | Add exhaust fan, then scrape | Moderate effort | Mold behind old layers |
| Exterior rain entry | Seal gaps, prime, repaint | High effort | Rotting wood framing |
| Latex over oil | Sand gloss, use bonding primer | Moderate effort | Missing the primer step |
| No primer used | Strip bare, seal, repaint | High effort | Stains bleeding through |
| Cold weather curing | Wait for warm days, redo | Low effort | Freezing overnight temps |
| Leaking pipe above | Fix plumbing first, then prep | High effort | Hidden water damage spreading |
Match your situation to the right row before buying supplies. Treating a plumbing leak like a simple humidity problem just wastes your weekend. The effort column tells you what to expect, so plan your time accordingly.
Signs of a good repair job
Checking the edges before you prime
A professional result starts before the primer can touches the wall. Run your fingernail along the edge where the bare wall meets the remaining old layer. If your nail catches a ridge thicker than a piece of paper, you haven’t sanded enough. That ridge will show through the final topcoat as a visible shadow.
Feathering takes patience. Switch from 80-grit to 120-grit paper once the sharp drop is gone. Wipe the dust away and look at the wall from an angle with a flashlight held flat against it. Raking light reveals every bump and dip that straight-on lighting hides. If the transition disappears under that harsh light, it’ll disappear under your topcoat.
Choosing the right primer for the surface
Bare drywall acts like a sponge. If you skip a PVA drywall sealer and go straight to a topcoat, the paper absorbs the liquid unevenly. The finish flashes dull in some spots and shiny in others. A dedicated sealer costs less than a gallon of topcoat and prevents this.
Bare wood needs something different. Knots and sap streaks bleed brown stains right through standard water-based formulas. Use an oil-based or shellac-based stain-blocking primer on wood. It seals the pores and locks the tannins inside. The trade-off is stronger fumes and cleanup with mineral spirits instead of water, but skipping it means watching brown rings appear on your fresh white wall within weeks.
Peeling paint problems and fixes
When things go wrong during the repair, the symptoms tell you exactly what happened. Match what you see to the table below to fix it fast.
| What you notice | What it usually means | What to do first | How to stop it happening again |
|---|---|---|---|
| Bubbles forming immediately | Wall is still damp | Stop painting, let dry | Test with plastic wrap first |
| New coat cracking quickly | Applied layer too thick | Sand smooth, reapply thin | Use less product per stroke |
| Edges lifting again | Missed sanding the ridge | Scrape, sand, reprime | Check with fingernail test |
| Brown spots bleeding through | Used wrong primer type | Sand, apply shellac primer | Block stains before topcoat |
| Chalky dust under brush | Old surface wasn’t cleaned | Wash wall, let dry | Wipe dust before priming |
| Finish drying too rough | Room was too hot | Sand lightly, recoat cooler | Check can temperature limits |
Don’t ignore these signs hoping the next layer will hide them. Each symptom points to a physical problem that gets worse if covered up. Fix the root cause before moving forward.
Safety rules for old layers
Homes built before 1978 likely have lead-based coatings on the walls. Scraping or sanding those surfaces creates toxic dust that settles on floors and furniture. The US Environmental Protection Agency enforces the Renovation, Repair and Painting Rule, which requires certified practices when disturbing these materials in pre-1978 housing. You can read the full requirements on the EPA lead renovation guidelines page.
If your home falls into that age range, buy a recognized testing kit from a hardware store or hire a certified inspector before you pick up a scraper. If the test is positive, you can’t dry-sand the wall.
Even without lead, silica dust from sanding joint compound irritates lungs. An N95 respirator is the minimum protection. Wet-sanding reduces airborne particles significantly.
There’s a boundary here. If the wall beneath the peeling layers feels spongy, crumbles when pressed, or shows black mold growth larger than a few square inches, stop working. Structural rot and extensive mold remediation require licensed professionals. Sealing over rotten wood traps moisture and accelerates decay.
What the repair actually costs
The price depends entirely on the size of the damaged area and the cause. For a small interior patch under 10 square feet with no underlying water damage, you’re mostly paying for supplies. A good carbide scraper, sandpaper, a quart of stain-blocking primer, and a quart of matching topcoat are inexpensive relative to the alternative.
Time is the bigger expense. Rushing the drying phases ruins the finish. Expect to spend 30 minutes scraping and sanding, followed by several hours of waiting for primer and topcoats to cure between applications. Spread the work over two days to avoid trapping moisture under wet layers.
If the peeling stems from an unresolved leak, the cost shifts dramatically. Fixing a plumbing issue or replacing rotted exterior sheathing runs into hundreds or thousands of dollars. Repainting before fixing the water source wastes whatever you spend on supplies.
Exterior jobs cost more because they require weather-resistant products and scaffolding or tall ladders. Prices fluctuate by region and season. To get an accurate number for your specific situation, measure the square footage of the affected wall and ask for quotes from local suppliers or contractors based on that measurement. Don’t rely on national averages for a local job.
Keeping the new coat attached
Your repair only lasts if the environment stops attacking it. Humidity control is the main defense for interior walls. Bathrooms and kitchens need exhaust fans vented to the outside, not just into the attic. Run the fan during showers and for 20 minutes afterward to pull moisture out of the drywall.
Exterior walls need clear drainage. Gutters overflowing onto siding keep the wood permanently wet. Clean them twice a year. Trim bushes back at least 12 inches from painted surfaces so air circulates and dries the wall after rain.
Check the repaired area once a season. Look for hairline cracks or slight lifting at the edges. Catching a 1-inch failure now takes five minutes to fix. Ignoring it lets water behind the film, turning a small touch-up into a full wall strip later.
Keep a small amount of the exact topcoat you used stored in a sealed jar in a climate-controlled space. Garage temperature swings ruin leftover product. Having the original batch means your touch-ups blend perfectly instead of flashing a slightly different shade.
When scraping and repainting is wrong
Sometimes the method described here won’t solve your problem, and trying it wastes money or creates hazards.
If the plaster itself is detaching from the wooden lath behind it, you’ll hear a hollow sound when you tap the wall. Scraping the surface won’t help because the structural base is falling away. You need a plasterer to reattach or replace the wall system.
If you find widespread black or green fungal growth beneath the peeling layers, don’t just clean and paint. Covering active mold traps spores against the living space. Hire a certified mold remediation specialist to remove the contaminated materials safely.
For historic buildings with original finishes, removing old layers destroys architectural value. Standard scraping ruins the patina. Consult a historic preservation expert who uses specialized chemical strippers and conservation methods rather than aggressive mechanical removal.
If the peeling spans an entire house exterior uniformly, the issue isn’t a local leak. It’s likely a systemic failure from incompatible products applied during the last renovation. Stripping the whole building requires commercial equipment and permits. Call a professional painting contractor for that scale of work.
Frequently asked questions
Can I just paint over the peeling spots?
No, applying new product over loose edges guarantees failure. The fresh layer bonds only to the unstable old one, pulling it down as it shrinks during curing. You must scrape away everything that moves and feather the edges before priming.
Why does my bathroom ceiling peel so fast?
Steam condenses on cold ceilings, soaking the porous surface repeatedly. Without a proper exhaust fan running during and after showers, the moisture breaks the adhesive bond. Install a fan rated for your room’s square footage to stop it.
How long should I wait between coats?
Check the specific hours printed on your product’s label, as formulas vary widely. Standard latex usually needs 2 to 4 hours in a 70°F room with good airflow. High humidity or cold temperatures double that required drying time.
Is it safe to sand old exterior siding?
It’s safe only if you confirm the absence of lead first. Homes built before 1978 likely contain toxic materials. Test the surface before sanding, wear an N95 mask, and lay drop cloths to catch debris if the test comes back negative.
What happens if I skip the primer step?
Skipping primer causes uneven absorption and poor adhesion. Bare drywall drinks the topcoat unevenly, leaving dull patches. Bare wood bleeds tannins through the finish. Primer seals the surface and provides a uniform texture for the final layer.
Does the old paint type matter for repairs?
Yes, mixing incompatible types causes immediate peeling. Oil-based layers resist water-based products unless you scuff the gloss thoroughly and apply a specific bonding primer first. Always test the old surface with alcohol to identify its base.
How do I match the existing wall color?
Take a clean, quarter-sized chip of the old color to a paint store with a spectrophotometer. They scan the chip to generate a custom formula. Buying a standard color name off the shelf rarely matches faded walls accurately.
Will a dehumidifier stop the peeling?
A dehumidifier helps maintain indoor levels below 50 percent, preventing new moisture damage. However, it won’t reattach layers that already lost their bond. You still need to scrape, prime, and repaint the currently damaged areas.
Starting your wall repair today
Buy a carbide scraper and test your wall for moisture using the plastic wrap method tonight. If the wall stays dry, scrape the loose edges tomorrow, feather the transition with 80-grit sandpaper, and apply your primer. You’ll know the prep worked when the transition feels perfectly smooth under your fingertips. If the plastic wrap gathers heavy condensation, stop and call a plumber or roofer to find the water source first.
Related posts:
 What Happens If You Paint Without a Primer? – Peeling, Streaks & Mistakes That Cost You Later
 What Happens If Primer Gets Rained On– Risks & How to Fix It
 Blistering Paint Causes and Solutions – Why It Happens and How to Stop It
 Why Are There Hairline Cracks In My Primer Coat?– Causes & Best Way To Fix Them