
Stopping how to stop water stains coming through paint requires sealing the stain with a solvent-based or shellac primer before applying any topcoat. Standard latex wall paint won’t block it because the water-soluble discoloration bleeds straight through.
The exact product you need depends on the stain’s size, whether the leak is fully fixed, and the surface material underneath. These three things change which primer works and how long the job takes.
Who needs a stain-blocking primer
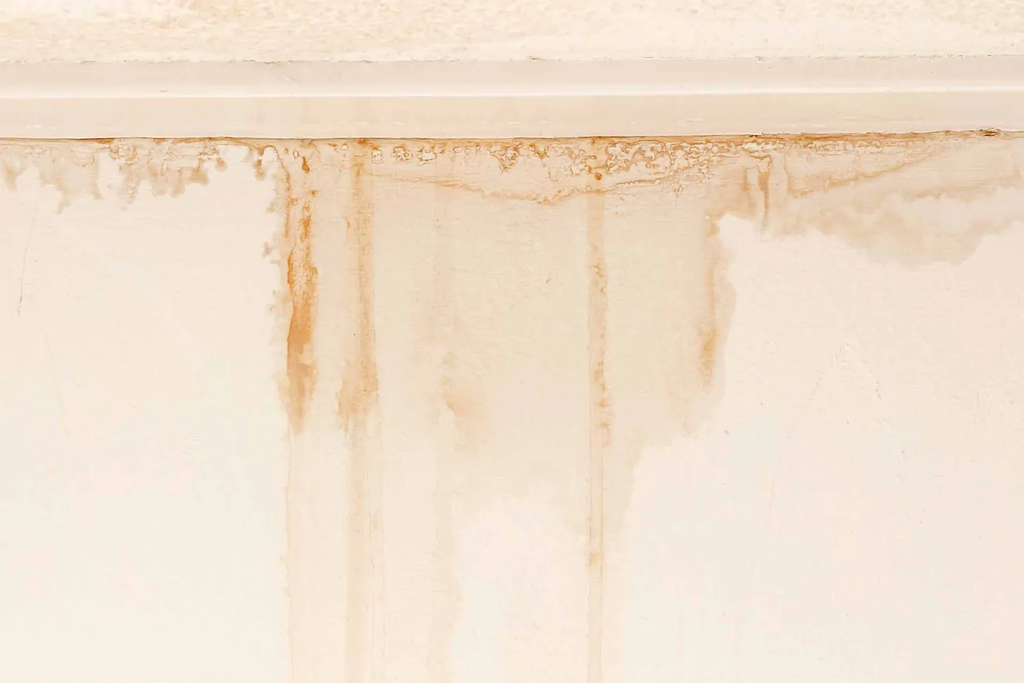
Someone typing this usually has a brown or yellow ring on their ceiling that keeps returning after they repaint it. That person needs a specific sealer, not another coat of regular wall paint.
Another reader might be flipping a house and covering old smoke or moisture marks on every room’s ceiling. They need bulk coverage and fast drying times so they don’t lose days waiting between coats.
A third person could have an active roof leak they haven’t repaired yet. They need to fix the plumbing or roofing first, because no primer seals over moving water. This page serves the first two readers. If your roof still drips when it rains, call a roofer before buying any paint. The instructions below assume the moisture source is completely dry and the room is ventilated.
7 Best Paint to Cover Water Stains on Ceiling (Tested & Reviewed)
What changes the result
The type of primer decides everything. Water-based primers rarely block heavy tannin or mineral stains. You need a shellac-based or oil-based sealer for those. Check the label on the can for “stain-blocking” before you buy it.
How wet the surface is matters just as much. Primer applied to damp drywall peels off within weeks. Press a paper towel against the spot; if it feels cool or damp, wait longer. A moisture meter gives you a real number, but the towel test works in a pinch.
The size of the stain changes how many coats you’ll apply. A spot under 6 inches across usually takes one coat of shellac primer. Anything larger often needs two coats, letting the first dry completely before adding the second.
Ventilation speed affects drying time and safety. Shellac primers use strong solvents. Open two windows on opposite sides of the room to create a cross-breeze. Without airflow, the fumes build up quickly and the primer stays tacky far longer than the can says it should.
Surface texture is the thing people get wrong most often. Painting over a popcorn ceiling without checking if the texture holds water leads to clumps falling off. Test a small area with a damp sponge first.
Steps to stop water stains coming through paint
Follow these steps in order once you’ve confirmed the leak is fixed and the drywall is completely dry. Rushing the prep work causes the stain to return.
- Lay a plastic drop cloth directly under the stain to catch drips.
- Wipe the stained area with a damp cloth to remove loose dust. Let it dry for 30 minutes.
- Pour shellac-based or oil-based stain-blocking primer into a paint tray. Don’t thin it.
- Use a synthetic bristle brush to cut in a 2-inch border around the stain.
- Roll the primer over the entire stained area using a 3/8-inch nap roller cover.
- Wait for the primer to dry according to the time printed on your specific can. Shellac usually dries in 45 minutes; oil-based takes up to 24 hours.
- Inspect the sealed area under bright light. If the brown color shows through, apply a second coat of primer.
- Once the primer is fully opaque and dry, roll two coats of standard latex ceiling paint over it.
The single judgement call here is knowing when the primer has actually blocked the stain. Don’t guess based on time alone. Look at the surface under a flashlight held flat against the ceiling. If you see any shadow of the original discoloration, it isn’t sealed yet.
Adding topcoat over a visible shadow guarantees the stain will bleed through again. If the drywall feels soft or crumbles when you press it, stop painting. Replacing damaged drywall requires tools and skills beyond a simple paint job, so hire a contractor for that part.
Situations and what each one needs
Different stains require different approaches depending on what caused them and where they are. Match your situation to the table below to pick the right method.
| Situation | What to do | Time needed | Watch out for |
|---|---|---|---|
| Small ceiling ring | One shellac primer coat | 2 hours total | Fumes need open windows |
| Large ceiling stain | Two oil-based primer coats | 48 hours total | Long drying between coats |
| Bathroom moisture mark | Clean mold, then shellac prime | 3 hours total | Mold returns without ventilation |
| Wood paneling bleed | Deglosser, then shellac primer | 4 hours total | Bleed-through if unsealed knots remain |
| Fresh unpainted drywall | Stain-blocking primer only | 3 hours total | Regular primer won’t block stains |
| Popcorn textured ceiling | Spray-on shellac primer only | 2 hours total | Rolling pulls texture down |
Details that keep stains from returning
Preparing the surface properly
Dust and grease prevent primer from bonding to the drywall. Wiping the stain with a slightly damp cloth removes the barrier that makes paint peel later. Don’t soak the drywall while doing this.
If the stain sits near a bathroom vent, check for soap residue. Soap breaks down the bond between the sealer and the ceiling. Clean it with a mild detergent and let it dry completely before priming.
Choosing the right application method
Rolling primer over a popcorn ceiling tears the texture off in chunks. Spraying the shellac primer from an aerosol can keeps the texture intact while sealing the minerals underneath.
For flat drywall, a 3/8-inch nap roller pushes the primer into the pores better than a foam roller does. Foam leaves air bubbles that dry into tiny craters, giving the stain a path back to the surface.
Why stains bleed through fresh paint
When a sealed stain still shows up, something went wrong during prep or product selection. Match what you see to the cause so you don’t repeat the same work twice.
| What you notice | What it usually means | What to do first | How to stop it happening again |
|---|---|---|---|
| Brown ring returns | Used water-based primer | Sand, apply shellac primer | Read labels for stain-blocking |
| Paint bubbles up | Surface was still damp | Scrape, dry, re-prime | Test dryness with paper towel |
| Texture falls off | Rolled a popcorn ceiling | Patch texture, spray primer | Always spray textured surfaces |
| Strong smell lingers | Poor room ventilation | Open windows, add fan | Create cross-breeze before starting |
| Primer peels in sheets | Skipped cleaning the dust | Strip, wash, dry, reapply | Wipe surface before every coat |
| Stain spreads outward | Active leak still running | Stop painting, fix leak | Confirm zero moisture first |
Safety rules for solvent-based primers
Shellac and oil-based primers release volatile organic compounds (VOCs) as they dry. The US Environmental Protection Agency regulates VOC limits in architectural coatings, and you can read the EPA VOC standards to see the legal thresholds for your region. Work in a room with at least two open windows.
Wear a respirator rated for organic vapors, not just a paper dust mask. Paper masks don’t filter solvent fumes. Keep the room away from open flames or pilot lights until the primer is fully cured, as the vapors are highly flammable.
If you feel dizzy or develop a headache, leave the room immediately. Don’t try to finish the last corner while feeling unwell. Pregnant women and children shouldn’t enter the room until the smell is entirely gone, which usually takes 24 to 48 hours after the final coat.
What sealing a stain actually costs
The biggest expense here isn’t the paint; it’s the primer. A quart of shellac-based stain-blocking primer costs more than a gallon of standard ceiling paint. You only need a quart for most ceiling stains, but buying a gallon by mistake wastes money since it expires faster once opened.
Time is the second cost. Oil-based primers force you to wait up to 24 hours between coats. If you’re paying someone to do this, that waiting period adds labor charges even when nobody is holding a brush. Shellac dries in under an hour, trading higher fume levels for a shorter timeline.
Drop cloths, brushes, and roller covers add smaller amounts. Don’t reuse a roller cover from a previous latex paint job. Buy a new 3/8-inch nap cover specifically for the sealer.
Keeping the ceiling clear afterwards
Once the stain is sealed and painted, the main threat is new moisture. Run your bathroom exhaust fan for 20 minutes after every shower to keep humidity off the ceiling.
Check the sealed spot every few months during the first year. Look for any yellowing at the edges of your patch. A slight color shift means the primer was too thin in that spot.
You don’t need to strip the whole ceiling to fix a small returning edge. Lightly sand the discolored inch, dab a little shellac primer on it with a brush, and touch up the topcoat. Catching it early stops the stain from migrating under the rest of the paint.
When sealing isn’t the right fix
Painting over a stain doesn’t work if the drywall is structurally compromised. Push your finger gently against the center of the stain. If the board flexes inward or feels spongy, the gypsum core has dissolved. You need to cut out the damaged section and screw in a drywall patch before any primer touches it.
If the stain is black or dark green, it might be mold rather than mineral deposits. Sealing live mold traps it behind the paint where it keeps growing. Wash the area with a dedicated mold cleaner first. If the mold covers more than a few square feet, hire a remediation specialist instead of handling it yourself.
Finally, if the roof above the stain hasn’t been repaired, no amount of primer will hold. Fix the leak first. Painting over active water damage just hides the problem until the ceiling collapses.
Frequently asked questions
Can I use regular wall primer on water stains?
No, standard latex primer won’t block them. Water dissolves the minerals in the stain and carries them right through the latex film. You must use a shellac-based or oil-based stain-blocking primer to seal the surface.
How long does shellac primer take to dry?
It usually dries to the touch in 45 minutes under normal room temperatures around 70°F. High humidity slows this down significantly. Check the back of your specific can, as drying times vary slightly between brands.
Why does my ceiling stain keep coming back?
The primer you used was likely water-based, or the drywall wasn’t fully dry when you painted it. Both mistakes let the stain bleed through. Sand it back, confirm the wood is dry, and apply a shellac sealer.
Is it safe to sleep in a room after priming?
Not immediately if you used shellac or oil-based products. The solvent fumes need at least 24 hours to dissipate with windows open. Sleep somewhere else until you can no longer smell the chemicals in the room.
What happens if I paint over a damp ceiling?
The paint will bubble, peel, or fail to stick at all. Moisture pushes the primer away from the drywall surface. Wait until a paper towel pressed against the spot comes away completely dry before applying anything.
Does it matter if the stain is old or new?
Yes, older stains are often harder and more mineralized, making them easier for shellac to lock down. Fresh stains might still contain active moisture. Always verify the leak is stopped regardless of the stain’s age.
Can I spray shellac primer from a can?
Yes, aerosol cans of shellac primer work well for spots under 12 inches across. They save you from cleaning brushes and rollers with harsh solvents afterward. For larger areas, pouring liquid primer into a tray is cheaper.
How many coats of topcoat do I need?
Two coats of standard ceiling paint give even coverage over the primer. One coat often looks patchy because the sealed area absorbs light differently than the surrounding ceiling. Let the first topcoat dry fully before rolling the second.
Your next step for stained ceilings
Buy a quart of shellac-based stain-blocking primer and a new 3/8-inch roller cover today. Apply it to the dry, clean stain and wait for the time printed on the can. You’ll know it worked when the brown color disappears completely under a flashlight beam. If the drywall crumbles when you touch it, stop and call a contractor.
Related posts:
 Zinsser BIN Shellac Base Primer Review (2026) – Best Primer for Stains & Odors?
 How to Stop Wood Stain Coming Through Paint- Prevent Bleeding & Staining Issues
 Zinsser Bulls Eye 1-2-3 Water-Based Primer– Best Primer for Stains & Adhesion
 7 Best Paint to Cover Water Stains on Ceiling (Tested & Reviewed)